


How to build an SSO flow with an
AWS Application Load Balancer
Security is always an important consideration when designing your application architecture. One of the most common approaches to securing your data is through SSO (Single Sign-On), which allows users to authenticate once and then gain access to all the related applications without having to login again for each one. It’s possible to configure a Single Sign-On flow with an AWS Application Load Balance in order to securely connect Jira and Confluence on premise. The result is an easier user experience while at the same time having better security than a traditional SSO infrastructure.
The role of AWS Application Load Balancers in your Atlassian Stack
The major role: distributing user traffic among available nodes
In Atlassian Data Center applications, a load balancer is placed to distribute users between the different nodes where the instance is installed. The load balancer routes traffic so that it never becomes a problem, usually relying on health checks and server diagnostics. This ensures that the application traffic doesn’t become an excessive stress, which typically happens during peaks of concurrent users, or when one or more of the nodes are down.
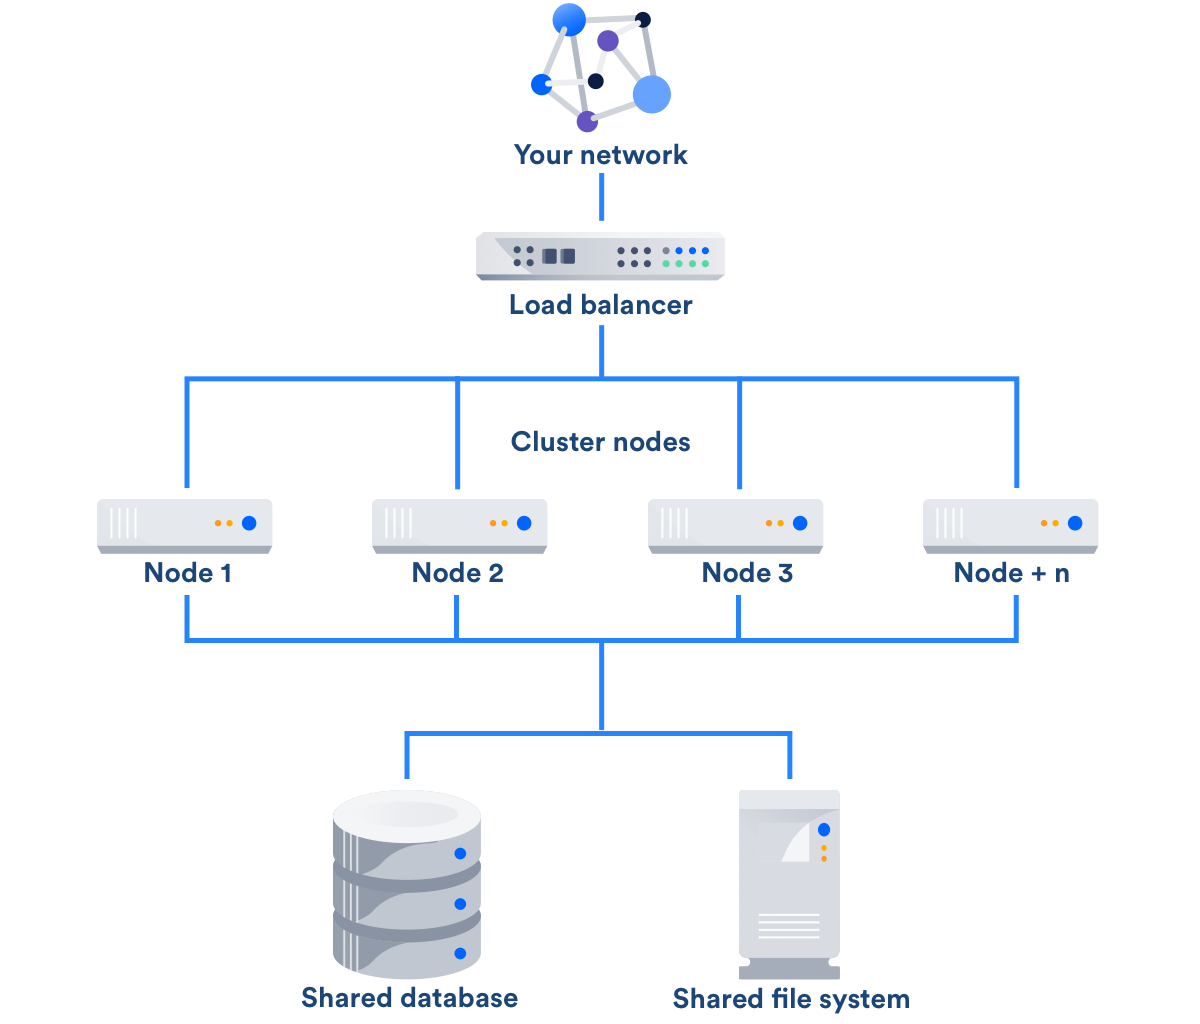
When Data Center applications are hosted in AWS, they are typically protected with an Application Load Balancer (ALB). With many interesting features, one worth mentioning is the possibility of sticky sessions that provide a more continuous experience to clients.
Using AWS Application Load Balancers and Amazon Cognito in your Jira authentication flow
Application Load Balancers can also be configured to authenticate users, usually in combination with Amazon Cognito identity pools or with cloud Identity Providers that support the OIDC protocol, such as Azure AD, Okta or GSuite.
Read the AWS documentation on How to authenticate users with an Application Load Balancer.
Main advantages of AWS ALB Authentication
If you’re already hosting your Atlassian applications in AWS, handling authentication with the Application Load Balancer is an interesting option. Indeed, the ALB works like a firewall that protects your Atlassian applications from unauthenticated traffic.
Authentication is far from being frictionless for the user:
- the ALB will ask you to sign in once,
- and the Atlassian application will ask for the password again.
That’s where our app comes in. With AWS ALB Amazon Authentication, the resolution app, users don’t have to authenticate a second time when they are redirected to the Atlassian application.
But there are many other advantages:
Provision and deprovision users! Since its second version, the AWS ALB app ships with a User Synchronization module. This allows to create connectors that synchronize your local Jira or Confluence user directory with your cloud user directory. Your users will always be up to date and your admins will never have to go into Jira to create a new account or deactivate an existing one!
Integrate with your existing cloud infrastructure. AWS ALB Authenthication fits perfectly if your company is already using OpenId Connect, Amazon Cognito, or any OIDC compliant Identity Provider.
Easy configuration. Select which token and token claim should be used to authenthicate into Jira or Confluence. With predefined templates for Amazon Cognito, Okta, Azure, and GSuite!
Let’s have a closer look at how the app fits into the picture.
Basic flow with AWS ALB Authentication
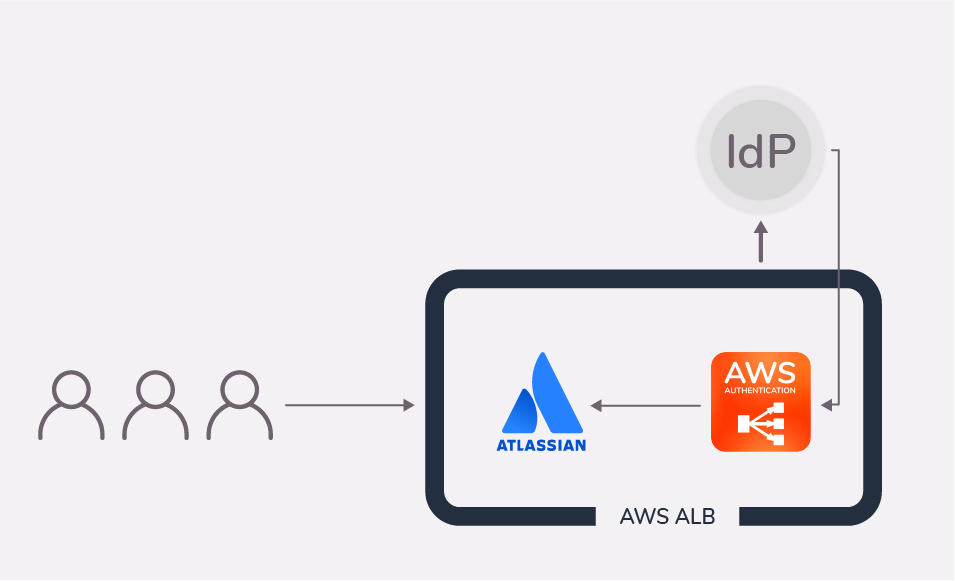
- An unauthenticated user tries to access “jira.awesomedomain.com”, but doesn’t reach Jira.
- The AWS Application Load Balancer intercepts the incoming http request before it reaches the Atlassian application and redirects the user to the Identity Provider for authentication.
- After a successful authentication, the user is redirected back to the ALB along with an ID token which allows the ALB to obtain more user details.
- Resolution’s app sends the user and its info to the Atlassian application with an HTTP header. No additional login is required. That’s a good job, right?
Comparison with a SAML SSO authentication flow
Let’s now look at a SAML SSO flow from a very high level to understand the main differences between the alb authentication and a more traditional SSO solution.
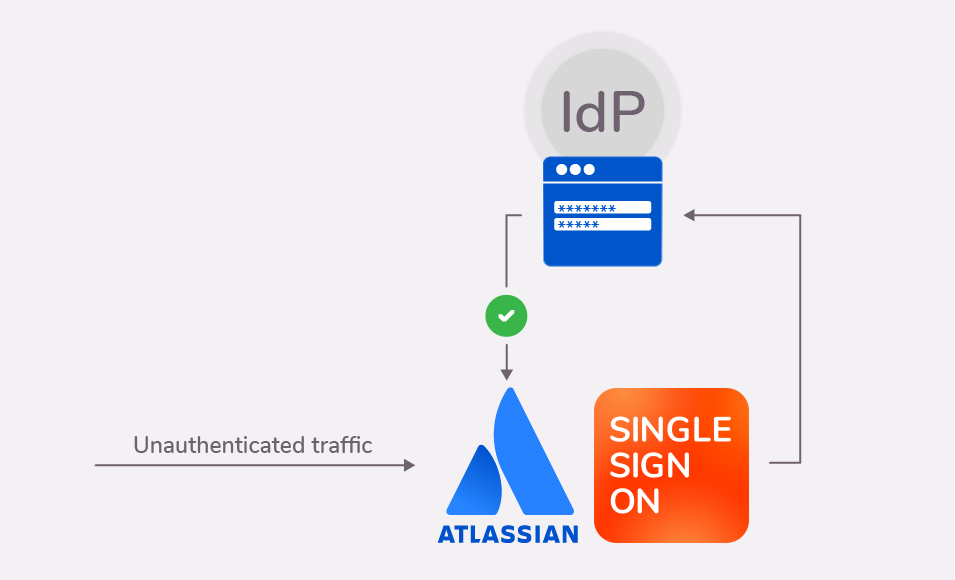
- An unauthenticated user tries to access “jira.awesomedomain.com”, and hits the Atlassian login page
- The SAML SSO app redirects the user to the IdP login page
- The user authenticates on the IdP
- If the authentication is successful, the user is redirected back to Jira and directly logged in.
As you can see, the main difference is that in a SAML SSO authentication flow an unauthenticated user will always arrive at the Atlassian product in the first place. This has some implications:
- You have to trust the security of your Atlassian product. If there’s a loophole allowing unauthenticated access to the instance, an unauthenticated user could exploit it.
- Public pages in the Atlassian product will be accessible to anybody. And Jira has many of them (if you haven’t configured your SSO app to protect them).
- Higher traffic load on the Atlassian application. All unauthenticated traffic hits Jira or Confluence directly before the logging event. Instead, the Application Load Balancer intercepts the incoming traffic and only lets in legitimate users. In scenarios where scripts or attackers try to ddos your Atlassian application, they will “only” be able to hit the load balancer. Your Atlassian product will be left alone.
How to configure your AWS ALB to handle your Atlassian users
Let’s see how to configure the app to handle users. We’ll first look at how to set up user authentication. Next, we’ll have a look at the different options for user provisioning and deprovisioning.
In this guide, we’re assuming that you have successfully hosted your Atlassian Server or Data Center applications in an AWS server and that you have an ALB or ELB in your Amazon infrastructure.
Setting up the Amazon ALB authentication process in three steps
Configuring the connection of the ALB with your IdP is quite simple. You will always need to follow the same three steps, although the details will change a bit from vendor to vendor.
Here’s a list of the specific guides:
Step 1. Select your IdP
It all starts with selecting the Identity Provider where your user directory is stored. If you have something other than Cognito, Azure, Okta or GSuite, just select Other.
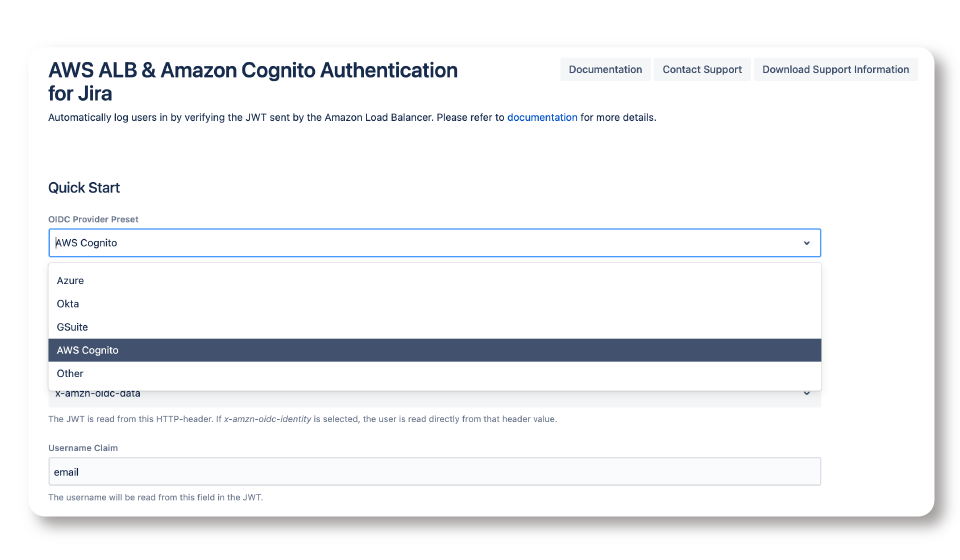
Step 2. Configure how the tokens will be processed
In this step, you need to tell the app where to look in the JWT that the ALB will exchange whenever a user tries to login. The screenshot shows the most common setup.
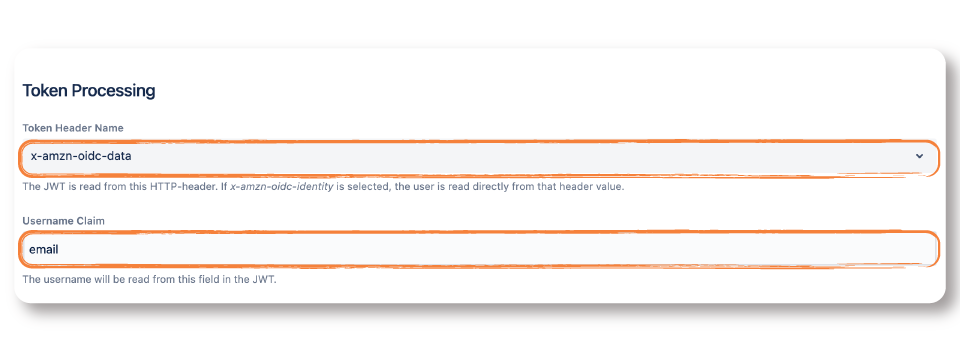
Token Header Name: What’s the name of the token header that contains the user info?
- Cognito: x-amzn-oidc-data
- Azure: x-amzn-oidc-accesstoken
- GSuite: x-amzn-oidc-data
- Okta: x-amzn-oidc-data
Username Claim: Which field contains the username?
- Cognito: email
- Azure: upn
- GSuite: email
- Okta: email
Step 3. Security checks
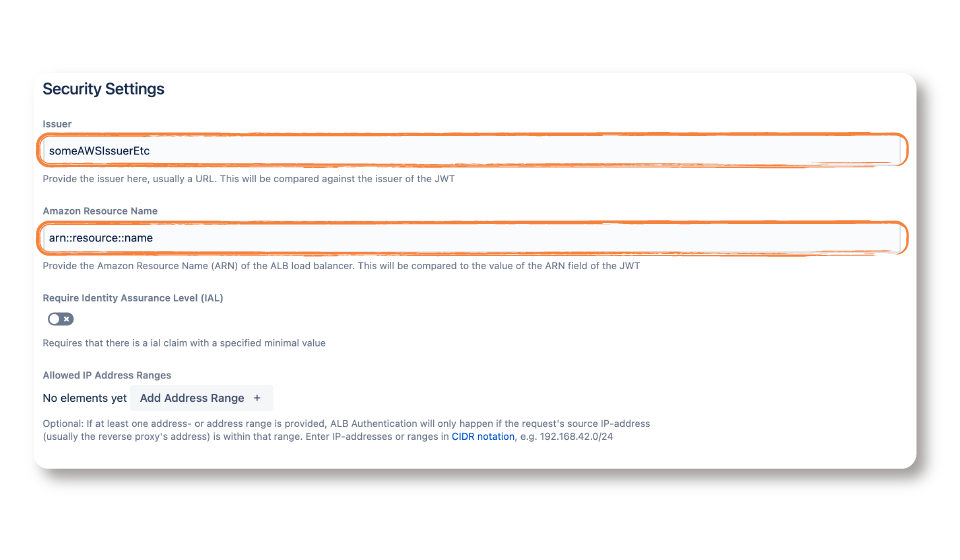
To ensure that the JWTs are not forged, you can have the app check the identity of the issuing IdP and your specific ALB.
To check the URL of the issuer, access your IdP as instructed in the corresponding guide (check the link at the start of this section)
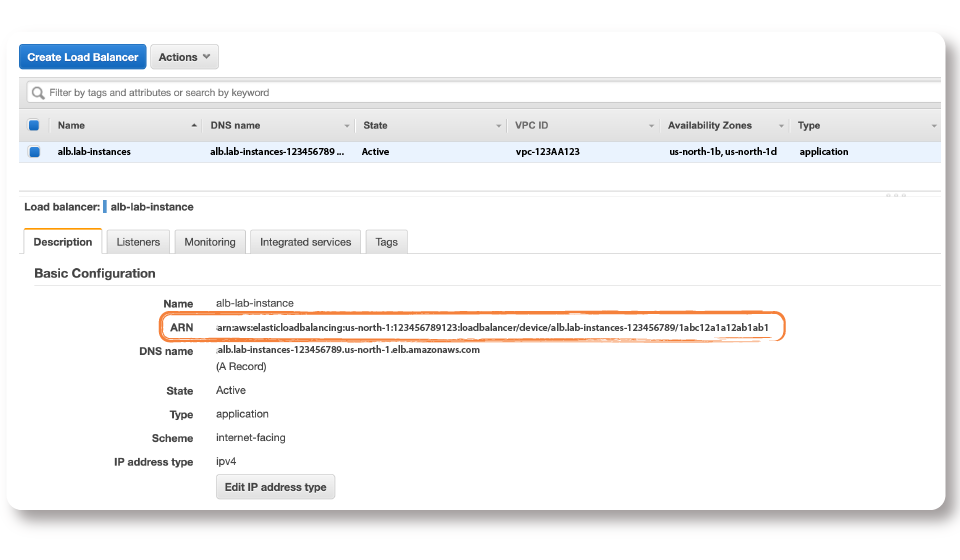
- To check the Amazon Resource Name (ARN), go to the Description tab of your Load Balancer in AWS.
Configuring user provisioning
There are two patterns for provisioning users with our AWS ALB Authentication app:
- Syncing the entire user directory, without authentication
- For individual users, during login
The two methods can perfectly coexist. For example, you can decide to update users as they login to grant them correct permissions to their Jira projects and Confluence spaces. But you can also synchronize the directory every night to ensure that you don’t have discrepancies in who should have an Atlassian account.
When in doubt, remember the major differences:
- Individual user updates during login can’t remove users – directory syncs can.
- Directory syncs will also update users who don’t have the habit of going into Jira or Confluence. This can be useful if someone needs to mention them or assign them work on a new project before they login.
Synchronizing the entire user directory
In this case, you will build an IdP connector to sync the entire directory.
Don’t be scared! This doesn’t mean that everyone in the company must get an account. You can filter by groups, and the most usual way is to only provision users who are assigned to Jira/Confluence in the IdP.
The steps for building the connector vary a lot from IdP to IdP, so we’ll just point you to the specific guides:
- Step-by-Step Guide to Setup a User Syn Connector with Azure AD
- Step-by-Step Guide to Setup a User Syn Connector with GSuite
- Step-by-Step Guide to Setup a User Syn Connector with Okta
- trigger the syncs manually from the configuration UI
- or scheduled the sync to happen at regular intervals. For example, every Saturday night.
Create & update individual users during authentication
If you choose to update users as they login, you can still choose between two different methods in the configuration.
- Use the information sent in the claims of the Amazon Load Balancer (Just in Time Connector)
- Connect to the IdP via REST API (IdP Connector)
The first method can be enough for simple needs, and is easier to setup. The second will satisfy even the most demanding use cases with dozens of user attributes.
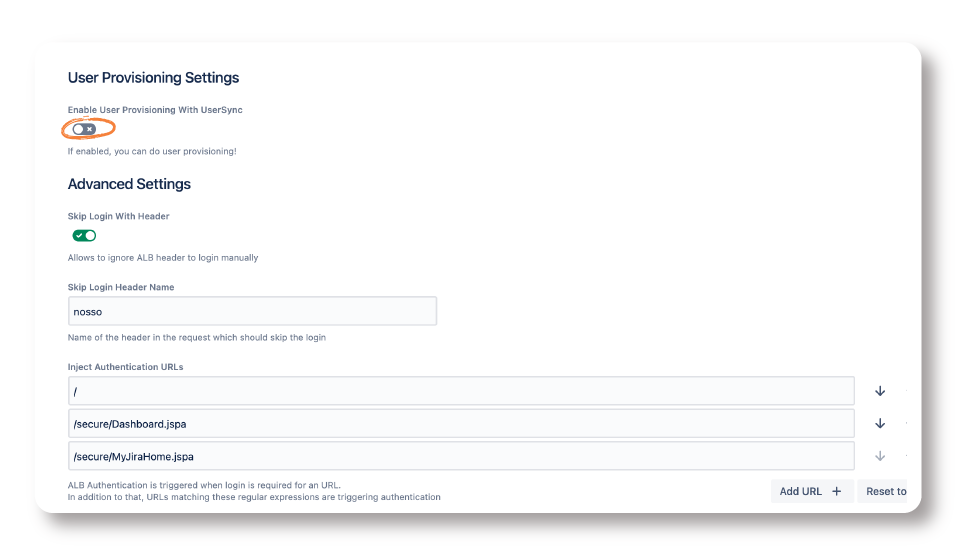
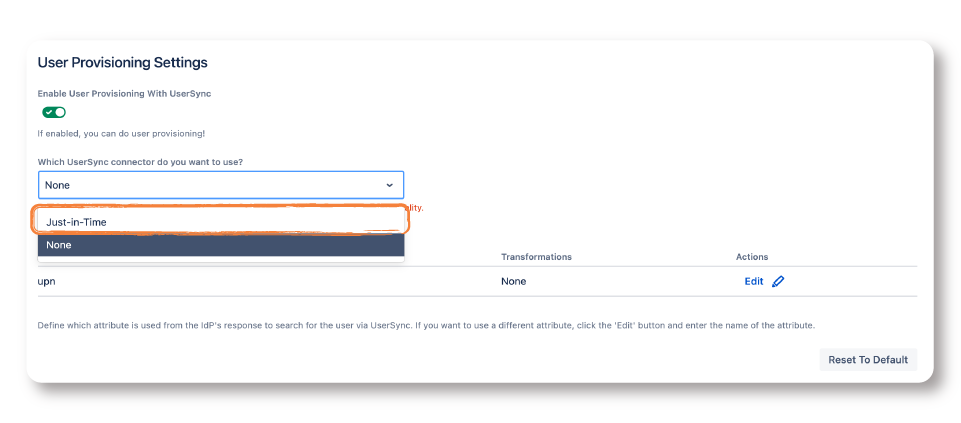
In both cases, you need to enable User Provisioning with User Sync. To do that, scroll to User Provisioning Settings and enable the toggle as shown below:
Update During Login with a Just in Time Connector
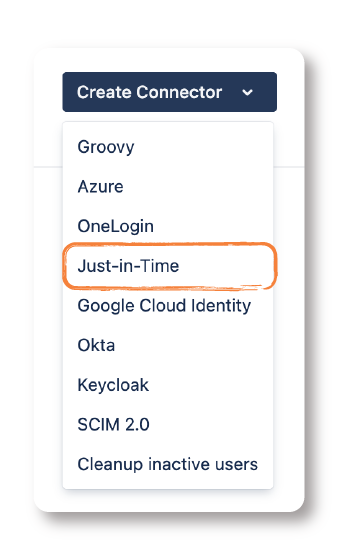
- Move over to User Sync and click on Create Connector. Then, select Just-in-Time from the dropdown.
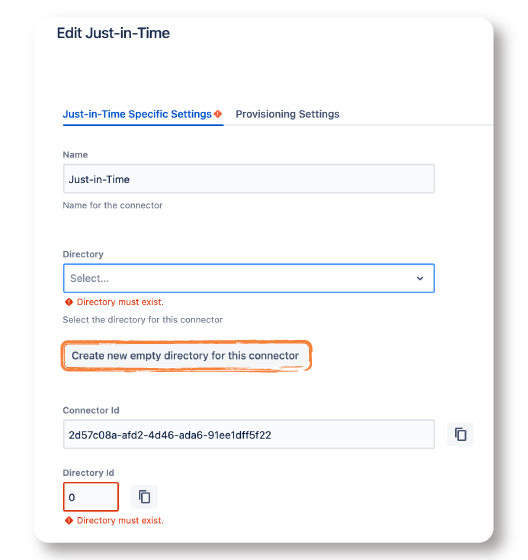
- In most cases, you want to create a new empty directory with the button
- Next, let’s move to the Provisioning Settings tab and map the claims sent by the Amazon Load Balancer with the Atlassian user. At least, map the following:
- Username
- Full Name
- E-Mail Address
- After saving the configuration, you only have to select the Just in Time Connector in the dropdown that shows under User Provisioning Settings.
- Finally, save the configuration again.
For more details, here’s the step-by-step guide: Just-In-Time Provisioning – AWS ALB & Amazon Cognito Authentication
Update During Login with an IdP Connector
Using an existing connector for your IdP, you can also activate a lookup function that triggers whenever a user tries to login.
What you have to do is instruct the connector to look the user up with a specific attribute:
- For Azure AD: upn
- For Okta, Google, Cognito and Keycloak: email
Now follow these steps In the User Provisioning Settings of the AWS ALB & Amazon Cognito Authentication app:
- Select the connector you want to choose
- Edit the operation “Attribute as received from the AWS ALB”
- Replace the Source Attribute Name with the field indicated above, and apply the changes.
Here’s the step-by-step guide: User Provisioning with UserSync – AWS ALB & Amazon Cognito Authentication
Conclusion
If you have successfully migrated your Atlassian instances to AWS, then AWS ALB Authentication is the easiest way to prioritize security and performance while maintaining a frictionless user authentication experience.