
If your sprint retrospectives have become a routine, predictable ritual, you’re leaving valuable insights on the table. The right retrospective facilitation techniques can transform a mundane meeting into a powerhouse of continuous improvement, uncovering deep-seated issues and celebrating hidden wins. In agile environments, the goal isn’t just to complete work; it’s to get better at completing work, together. This requires moving beyond the same old “What went well? What didn’t?” format that often leads to stale discussions and team fatigue.
Effective facilitation creates psychological safety, encourages balanced participation, and guides the team from simple reflection to concrete, actionable outcomes. A well-chosen technique can surface unspoken frustrations, highlight systemic blockers, or bring focus to the small, consistent wins that build momentum. Without a diverse toolkit of facilitation methods, teams risk falling into unproductive patterns, where the same few people speak up and the resulting action items fail to address the core problems.
This guide moves past generic advice to provide a comprehensive breakdown of eight powerful retrospective facilitation techniques. We will explore a variety of frameworks designed for specific scenarios, from processing emotionally charged sprints with “Mad, Sad, Glad” to conducting deep-dive root cause analyses using the “5 Whys”. By mastering these methods, Scrum Masters, Agile Coaches, and team leads can unlock their team’s full potential, foster genuine collaboration, and drive meaningful, sustainable change. This article will equip you with the practical steps and situational awareness needed to re-energize your agile practice and deliver measurable results.
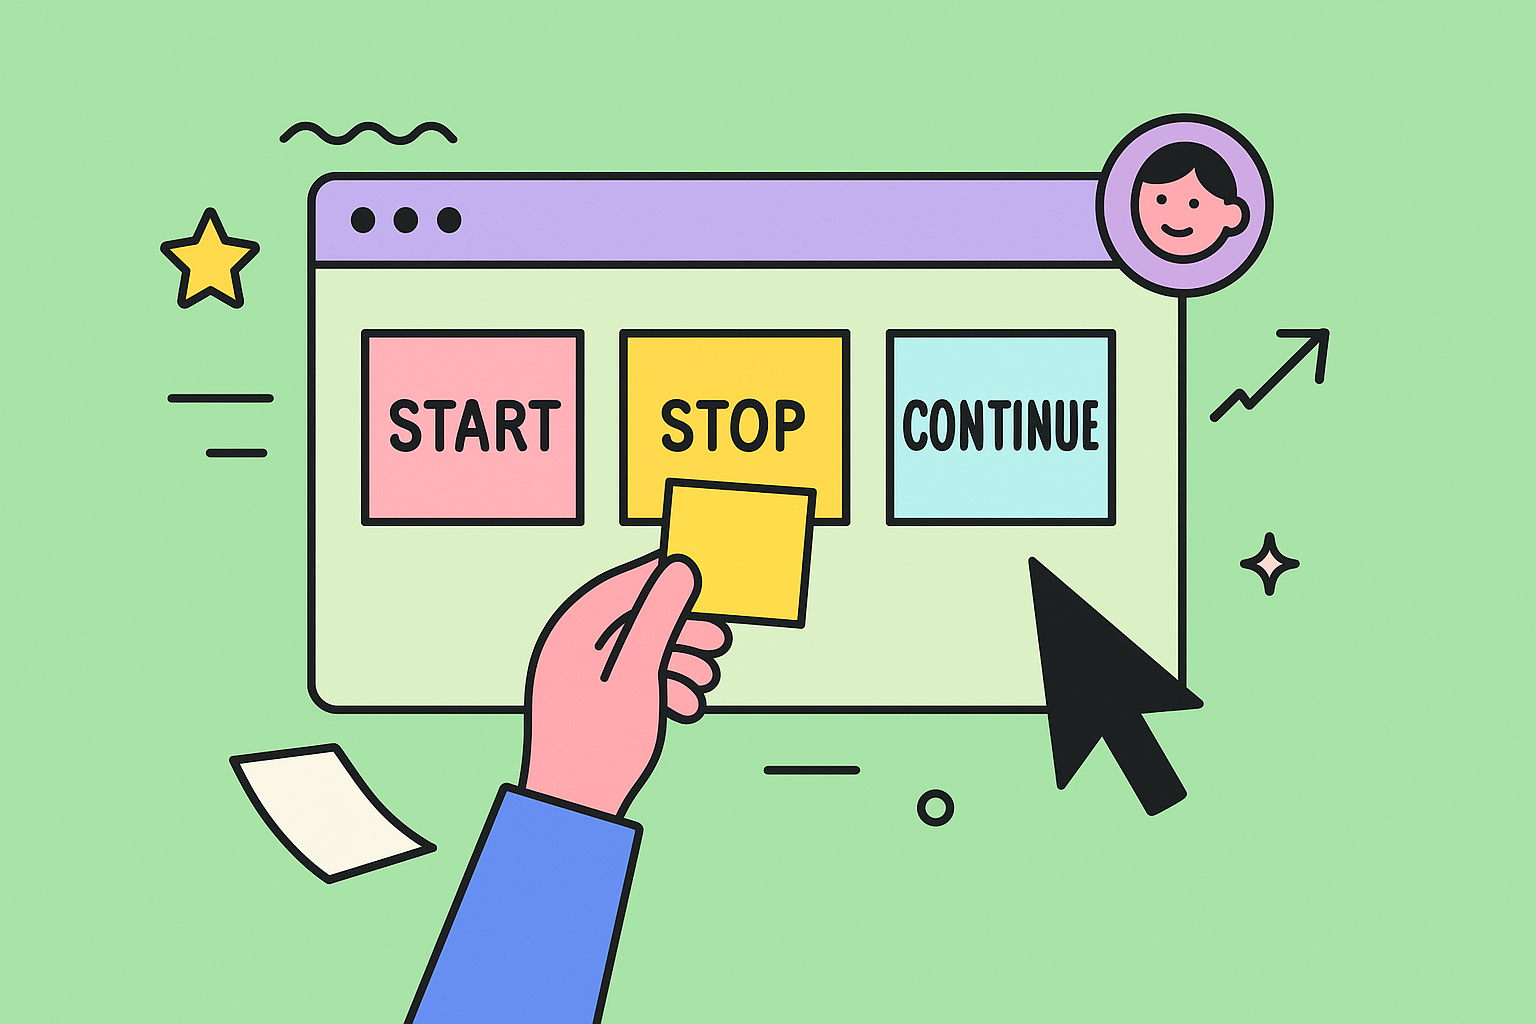
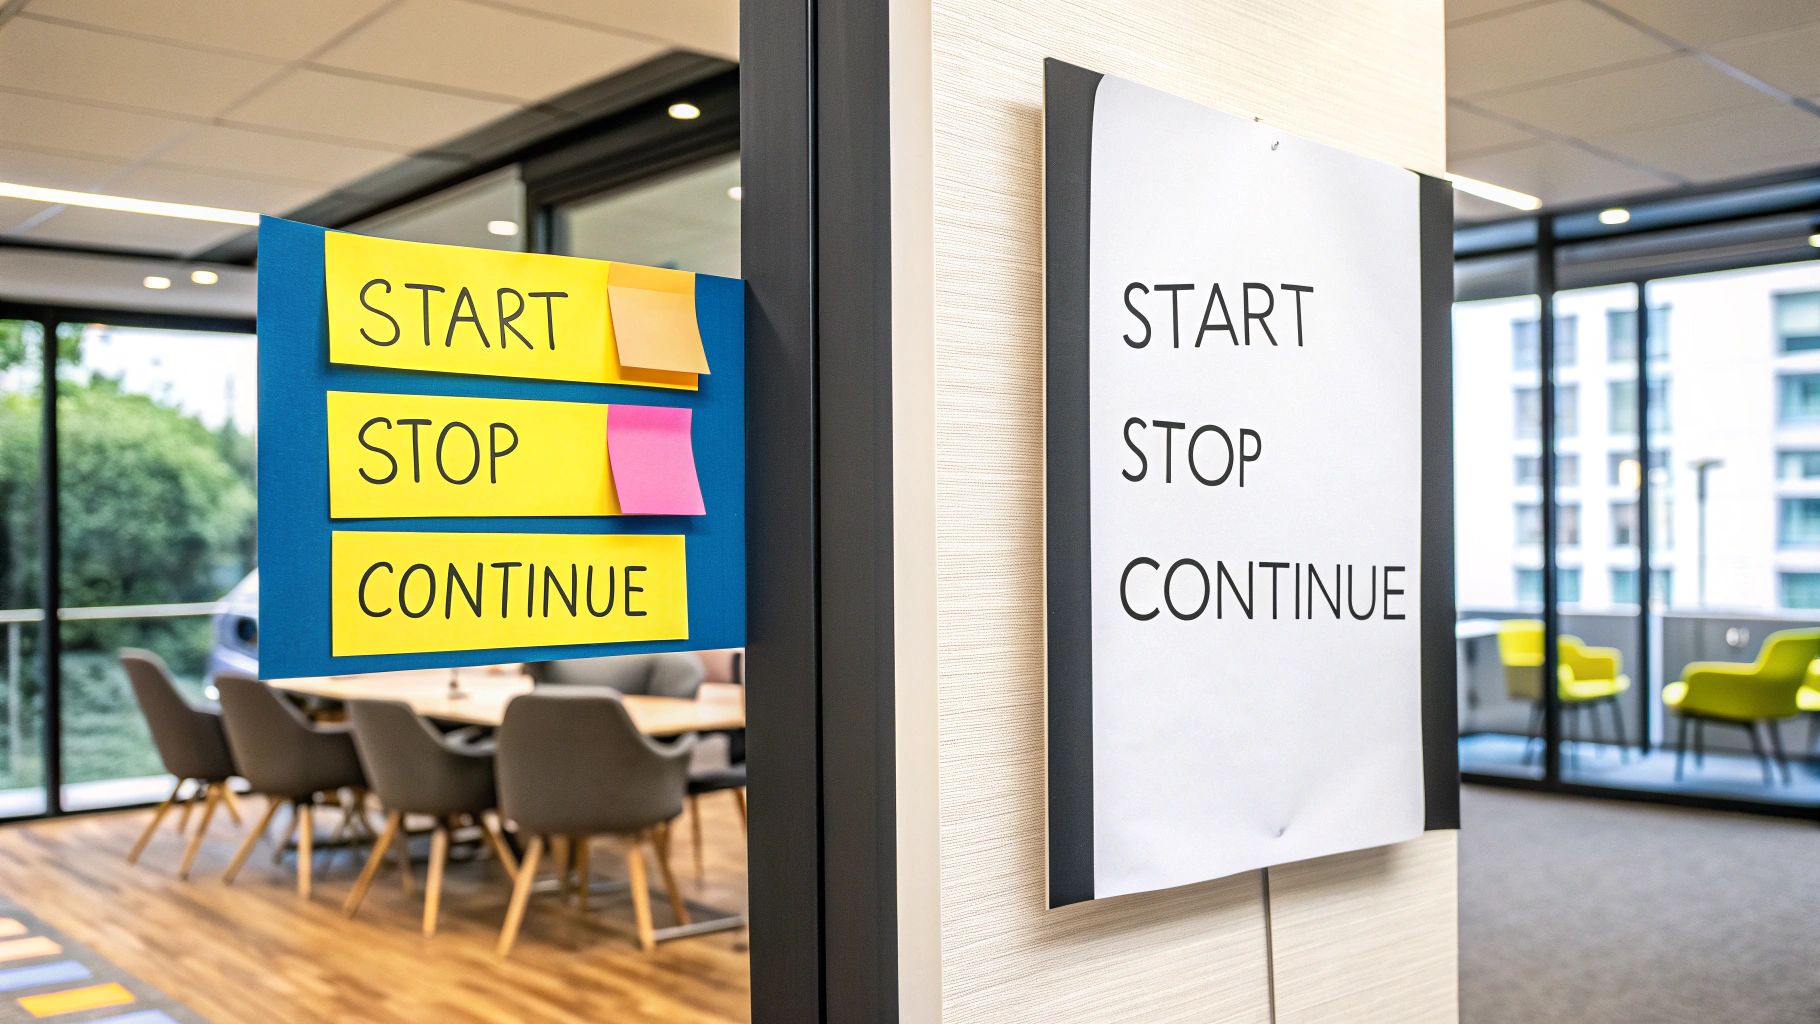
1. Start, Stop, Continue
A cornerstone of agile practices, the Start, Stop, Continue retrospective format is praised for its simplicity and direct focus on actionable outcomes. This technique structures team feedback into three distinct categories: what beneficial new practices should the team start doing, what detrimental or ineffective habits should they stop, and what valuable processes should they continue doing? This balanced approach prevents the session from devolving into only complaints by ensuring positive behaviors are also recognized and reinforced.
The framework’s power lies in its universal applicability. A software development team might identify they need to start writing more comprehensive unit tests, stop merging code without a peer review, and continue their daily stand-up meetings. Similarly, a marketing team could use it post-campaign to decide to start using a new analytics tool, stop last-minute creative changes, and continue their collaborative brainstorming sessions.
When to Use This Technique
This format is ideal for teams seeking a straightforward, action-oriented retrospective without complex setup. It works exceptionally well for:
- New or maturing teams who need a simple structure to guide their discussions.
- Cycles with clear successes and failures, making it easy to categorize feedback.
- Remote or hybrid teams, as it translates perfectly to digital whiteboards like Miro or Mural where columns can be created for each category.
How to Implement It Effectively
To maximize the value of a Start, Stop, Continue session, follow these steps:
- Silent Brainstorming: Give team members 5-10 minutes to silently write their ideas on sticky notes for each of the three categories. This encourages individual thought before group influence takes hold.
- Group and Theme: Have each person briefly explain their notes as they place them in the correct column on a whiteboard (physical or digital). Group similar items together to identify recurring themes.
- Discuss and Prioritize: Discuss the grouped themes. Use dot voting or a simple show of hands to identify the most critical items the team wants to address.
- Create Action Items: For the top 1-3 prioritized items in the “Start” and “Stop” categories, create specific, measurable, achievable, relevant, and time-bound (SMART) action items. Assign an owner to each action to ensure accountability.
Pro-Tip: Before beginning, dedicate five minutes to reviewing the action items from the previous retrospective. This reinforces accountability and demonstrates the value of the process.
For those looking to explore variations of this classic format, you can find a wealth of information and additional retrospective ideas. Learn more about creative Scrum retrospective ideas on Resolution.de. As one of the most foundational retrospective facilitation techniques, Start, Stop, Continue provides a reliable path to continuous improvement.
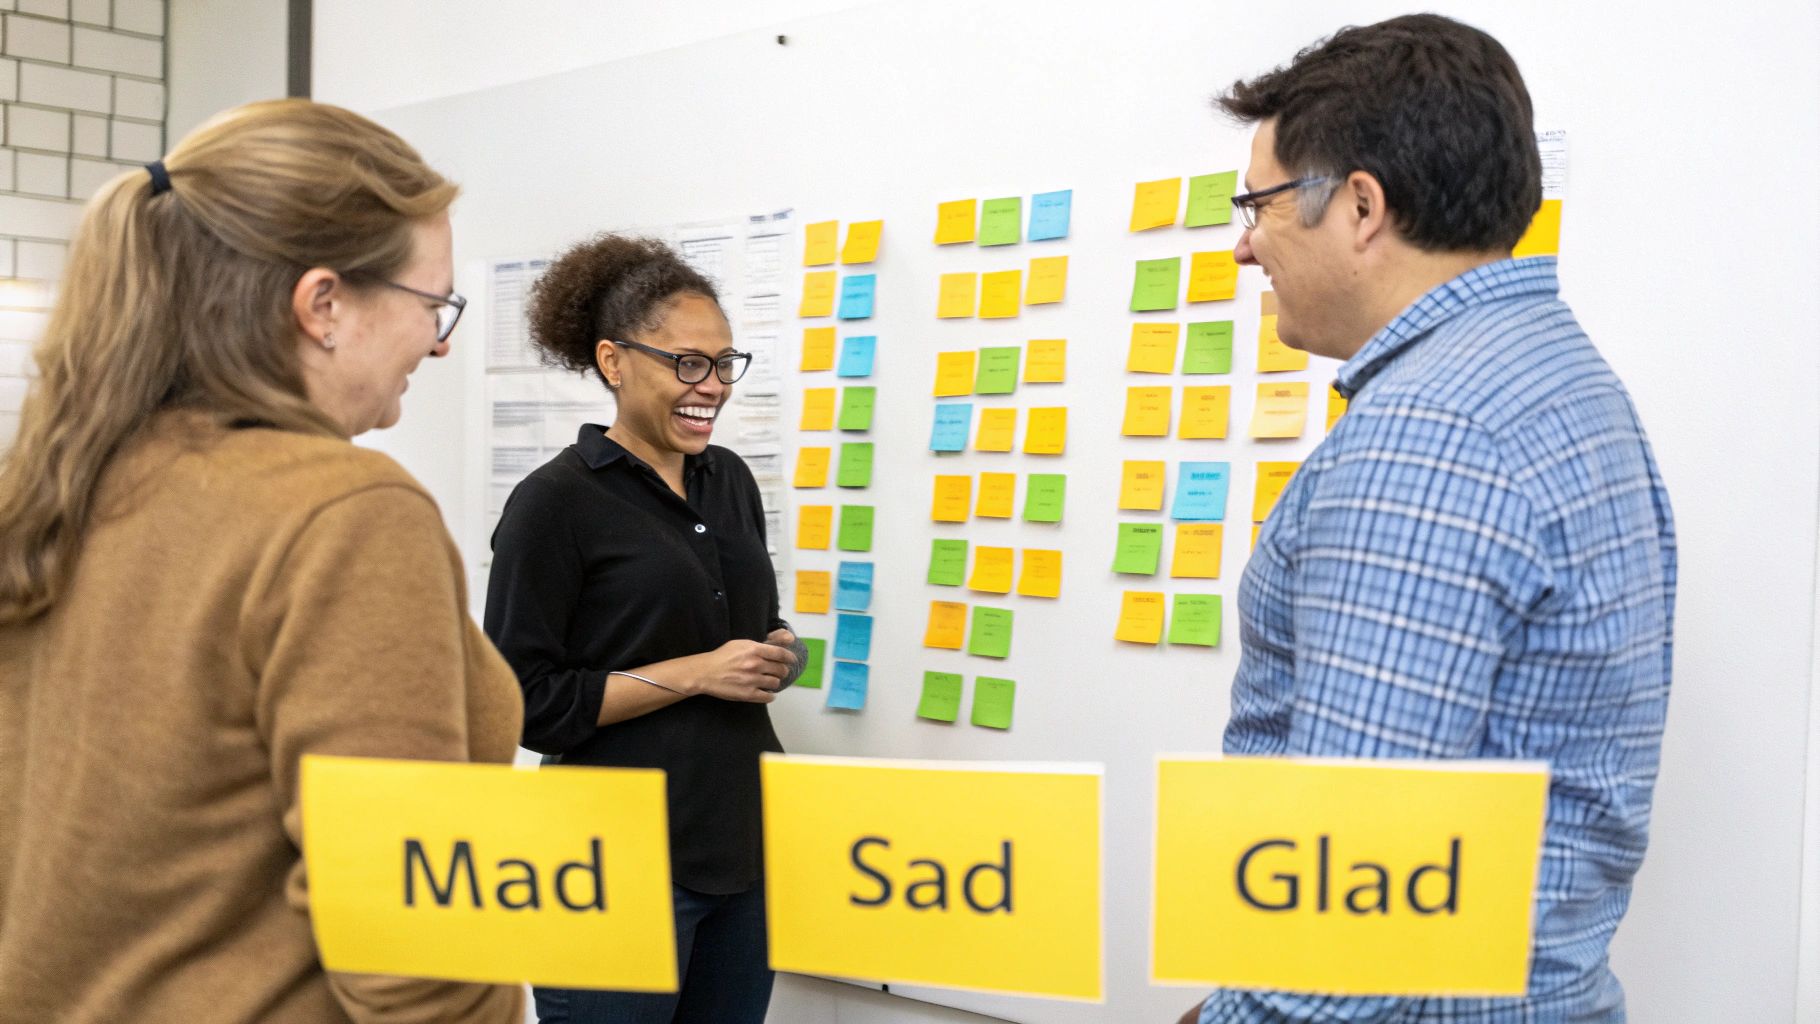
2. Mad, Sad, Glad
Moving beyond process-focused feedback, the Mad, Sad, Glad retrospective format centers on the team’s emotional journey. This technique encourages members to share their feelings by categorizing experiences into three emotional states: what made them Mad (frustrations, obstacles), what made them Sad (disappointments, missed opportunities), and what made them Glad (successes, positive interactions). By creating a dedicated space for emotional expression, it helps uncover underlying issues that a purely logical format might miss.
This human-centric approach builds psychological safety and team empathy. For example, after a challenging release with multiple production issues, a developer might feel mad about a recurring bug, sad that the team missed its deadline, but glad about the way everyone collaborated to fix the critical problems. An organization undergoing restructuring could use it to help employees process change, identifying what’s mad about new communication channels, sad about former colleagues leaving, and glad about new growth opportunities.
When to Use This Technique
This format is particularly powerful for teams navigating emotionally charged situations or when you want to improve team cohesion. It is ideal for:
- Teams that have experienced significant challenges, such as a failed product launch or a difficult sprint.
- Cycles involving high stress or interpersonal friction, helping to air out grievances constructively.
- Building deeper trust and empathy, as it encourages vulnerability in a structured, safe way.
How to Implement It Effectively
To successfully facilitate a Mad, Sad, Glad retrospective, the facilitator must prioritize creating a safe environment.
- Set the Stage: Begin by explaining the purpose is to understand shared feelings, not to assign blame. Emphasize that all expressed emotions are valid. For sensitive topics, consider anonymous input methods.
- Silent Reflection: Provide 10 minutes for team members to silently write down their points for each of the Mad, Sad, and Glad categories on individual notes.
- Share and Cluster: Each person shares their notes one by one, placing them in the appropriate column. As they do, group similar items to highlight common emotional themes.
- Transition to Action: After discussing the themes, particularly in the “Mad” and “Sad” columns, guide the conversation toward solutions. Ask, “What can we do to have fewer ‘Mad’ items next time?” or “How can we turn this ‘Sad’ point into a ‘Glad’ one?” Create clear action items for the most impactful issues.
Pro-Tip: Focus the discussion on events, processes, and situations, not people. Reframe personal comments like “I was mad at Pat” to “I felt mad when the deployment process failed.” This keeps the feedback constructive.
Facilitating emotional discussions requires skill and sensitivity, which is a key part of effective retrospective facilitation techniques. For those interested in building these skills, explore professional workshop facilitation training to guide your team more effectively. Learn more about effective facilitation on Resolution.de. This method transforms emotional data into a powerful catalyst for improvement.
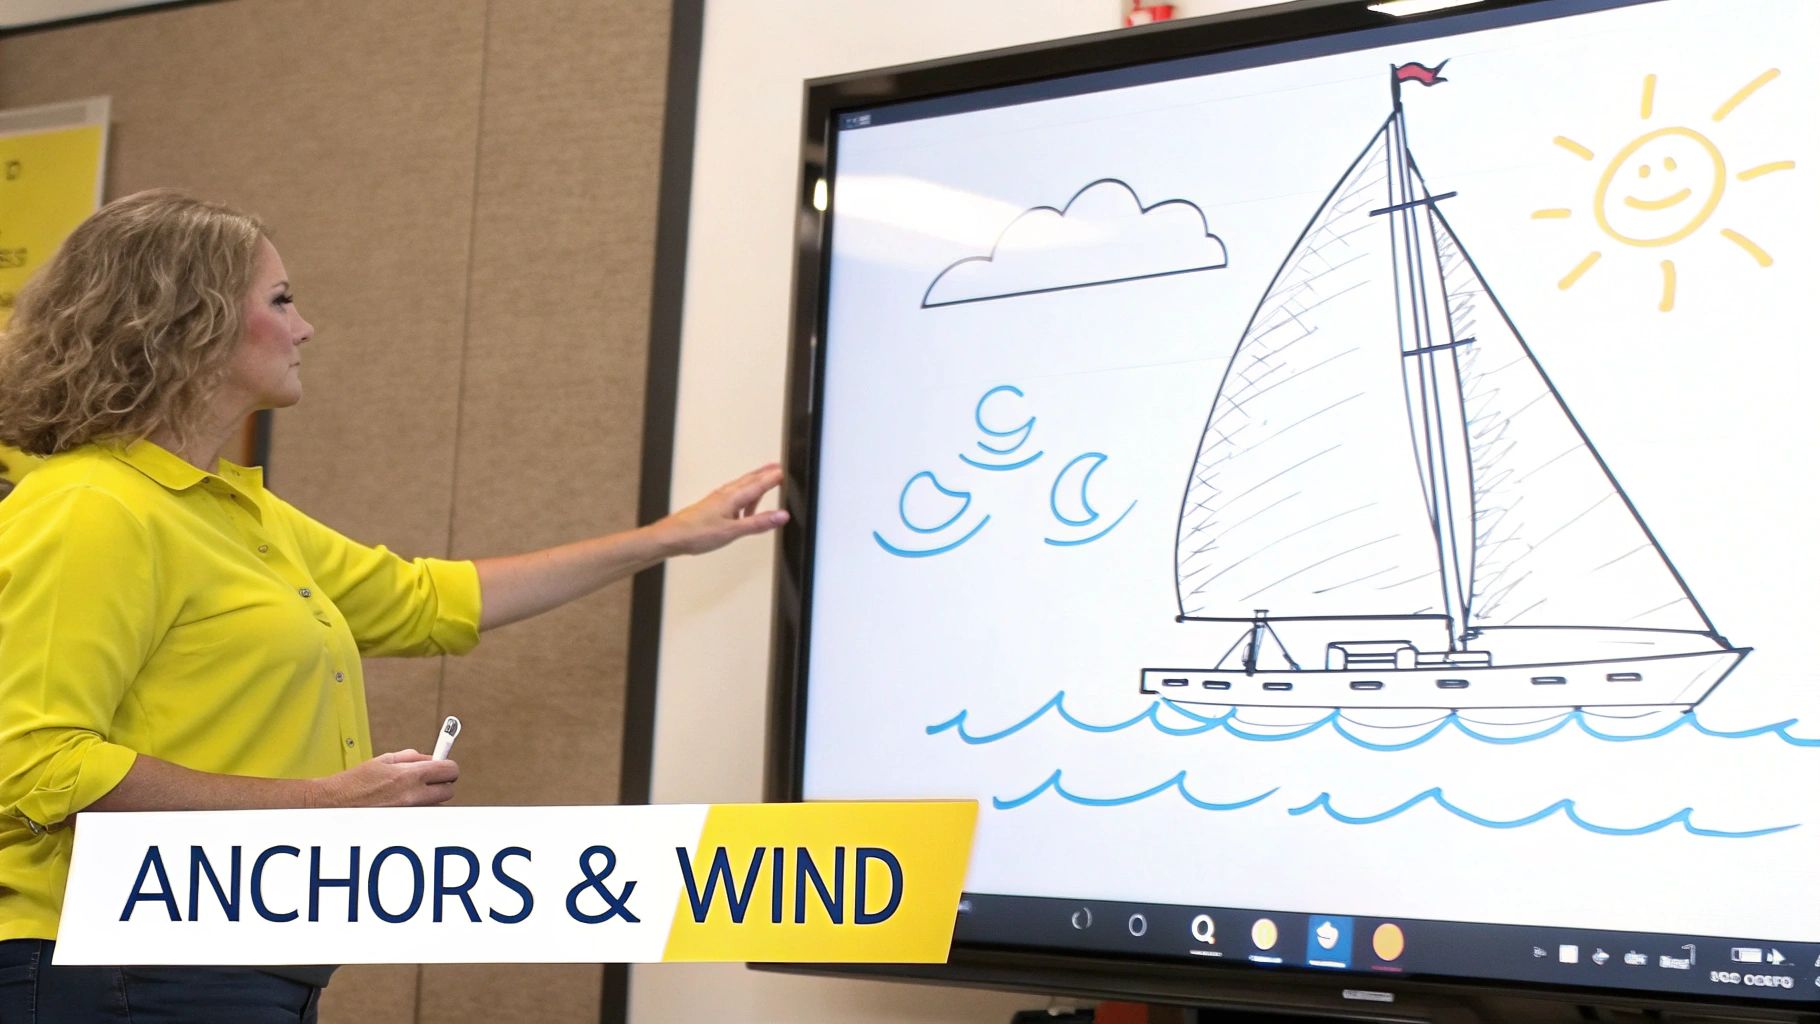
3. Sailboat/Anchors and Wind
The Sailboat retrospective is a powerful metaphorical technique that frames the team’s progress as a journey across the sea. This imaginative format helps make abstract concepts more tangible and engaging by asking the team to identify what helps them move forward and what holds them back. The core elements are the sailboat (representing the team), the wind (factors propelling them toward their goals), and the anchors (impediments slowing them down).
This visual approach encourages a different kind of thinking compared to more direct formats. A product team might identify clear documentation as a strong “wind” in their sails, while legacy code becomes a heavy “anchor.” Likewise, a sales team could see a new lead generation tool as a favorable wind, with a complicated CRM process acting as an anchor. The metaphor can even be extended to include an island (the team’s goal or vision) and rocks (potential risks on the horizon).
When to Use This Technique
The Sailboat method is one of the most versatile retrospective facilitation techniques, especially useful for teams that want to break away from routine and engage more creatively. It’s an excellent choice for:
- Visually-oriented teams who respond well to drawing and visual metaphors.
- Sessions where you want to balance problems with enablers, ensuring the discussion covers both what’s working and what isn’t.
- Breaking a pattern of low-energy or repetitive retrospectives by introducing a fun, gamified element.
- Remote teams, as drawing a sailboat on a digital whiteboard like Miro or Mural is simple and highly collaborative.
How to Implement It Effectively
To successfully run a Sailboat retrospective, guide your team through these steps:
- Set the Scene: Draw a large sailboat on a whiteboard. Add a distant island to represent the sprint goal or project vision. Explain the metaphor: the boat is the team, the wind helps you, and the anchors slow you down.
- Silent Brainstorming: Give everyone 5-10 minutes to write their thoughts on sticky notes. “Wind” notes should identify positive forces, while “Anchor” notes should identify obstacles.
- Plot the Course: Have team members place their “wind” notes near the sails and their “anchor” notes below the boat, near the anchor. As they do, they should briefly explain their point.
- Discuss and Cluster: Group similar anchors and winds together to spot patterns. Discuss the most significant themes. Which winds should be amplified? Which anchors are the heaviest and need to be pulled up?
- Define Actions: Use a voting method to prioritize the most critical anchors. Create clear, actionable steps to address them, assigning owners to ensure follow-through.
Pro-Tip: Don’t be afraid to expand the metaphor. Ask the team to identify “rocks” or “icebergs” to represent future risks or dangers the team needs to be aware of. This adds a valuable forward-looking, risk-management component to the exercise.
For a deeper dive into how this and other innovation games can be used, exploring the work of Luke Hohmann provides excellent context. This technique turns a standard meeting into a collaborative story, making it one of the most memorable retrospective facilitation techniques.
4. 4Ls: Liked, Learned, Lacked, Longed For
The 4Ls retrospective format (Liked, Learned, Lacked, Longed For) provides a holistic framework that encourages teams to reflect on an iteration from multiple emotional and factual angles. This technique balances positive reinforcement with constructive criticism by asking team members to identify what they Liked (positive events), what they Learned (new insights), what was Lacked (missing resources or support), and what they Longed For (aspirations for the future). It guides the conversation beyond simple process mechanics to explore feelings, growth, and team desires.
This method’s strength is its ability to create a well-rounded picture of the team’s experience. A research team analyzing a project phase might identify they Liked the collaborative data analysis sessions, Learned a new statistical method, Lacked access to a specific academic journal, and Longed For more dedicated time for exploratory research. This comprehensive feedback fosters a culture of learning and empathy.
When to Use This Technique
The 4Ls is one of the most versatile retrospective facilitation techniques, especially useful for teams that want a deeper, more reflective conversation. It is particularly effective for:
- Quarterly or post-project retrospectives where a broader review of experiences is beneficial.
- Learning-oriented teams that prioritize knowledge acquisition and personal growth.
- Situations where team morale is a concern, as the “Liked” and “Longed For” categories provide space for positive and aspirational discussion.
How to Implement It Effectively
To run a successful 4Ls retrospective, structure the session for balanced participation and clear outcomes.
- Set the Stage: Create four distinct columns or quadrants on a whiteboard, one for each “L”: Liked, Learned, Lacked, and Longed For. Briefly explain what each category represents to ensure shared understanding.
- Silent Generation: Give the team 10-15 minutes to silently write their thoughts for each of the four categories on sticky notes. Using different colored notes for each “L” can enhance visual organization.
- Share and Cluster: Ask each participant to place their notes in the corresponding quadrant and briefly explain their reasoning. As notes are added, group similar items to identify common themes within each category.
- Prioritize and Act: Focus the discussion on the “Lacked” and “Longed For” quadrants to generate improvement actions. Use dot voting to select the most impactful themes. Develop specific, actionable steps for the top 1-3 items and assign owners to drive them forward.
Pro-Tip: Pay close attention to the “Learned” category. Celebrate these insights as team achievements and discuss how this new knowledge can be applied or shared more broadly within the organization. This reinforces the value of continuous learning.
5. Timeline Retrospective
Popularized by agile pioneers like Diana Larsen and Esther Derby, the Timeline Retrospective is a powerful narrative technique that helps teams visualize the story of their iteration or project. It structures feedback chronologically, allowing participants to map significant events, key decisions, and their corresponding emotional journeys. By creating a shared visual history, this method uncovers the cause-and-effect relationships between events and team morale, revealing hidden patterns and critical learning moments.
This format excels at contextualizing feedback. Instead of isolated comments, the team constructs a coherent story. For instance, a project team reviewing a difficult multi-month delivery could map the initial kickoff, a surprise change in requirements, a critical bug discovery, and the final push to launch. By layering their feelings (e.g., excitement, frustration, relief) onto this timeline, they can pinpoint exactly why certain periods were stressful or successful, leading to a much deeper understanding than a standard feedback format might provide.
When to Use This Technique
The Timeline Retrospective is particularly effective for understanding the “journey” of a team or project, making it ideal for:
- End-of-project or major milestone reviews where a longer period needs to be analyzed.
- Teams recovering from a crisis or incident, as it helps safely reconstruct the sequence of events without assigning blame.
- Iterations with significant highs and lows, to better understand the drivers behind emotional and productivity shifts.
- Onboarding new team members, giving them a quick, insightful history of a project’s evolution.
How to Implement It Effectively
To run a successful Timeline Retrospective, guide your team through these steps:
- Draw the Timeline: Create a long horizontal line on a physical or digital whiteboard, marking the start and end dates of the period under review (e.g., Sprint Start, Sprint End).
- Plot Key Events: Ask the team to silently write down significant events, decisions, or milestones on sticky notes. Have them place these notes chronologically on the timeline. This should be a factual, objective exercise.
- Map Emotions and Feelings: Once the events are mapped, ask participants to add their emotional responses. Use a different color of sticky note to represent feelings (e.g., green for positive, pink for negative) and place them above or below the event line corresponding to when they felt that way.
- Analyze and Discuss: Step back and look at the completed timeline as a group. Discuss the patterns that emerge. Why did morale dip after a certain decision? What caused the spike in energy during a specific week? Focus on learning and understanding.
- Generate Action Items: Based on the insights from the discussion, identify actionable improvements. What could be done to replicate the positive patterns or mitigate the negative ones in the future? Create clear action items with owners.
Pro-Tip: Start by having the team plot major, official milestones first (e.g., releases, review meetings) to create a clear skeleton. Then, fill in the gaps with the smaller, more personal events and observations. This creates structure and prevents the timeline from becoming chaotic.
The visual and narrative nature of this format makes it one of the most engaging retrospective facilitation techniques. For more ways to keep your team engaged, you can find other great meeting engagement ideas on Resolution.de. By looking at the past as a story, teams can write a better future.
6. 5 Whys Root Cause Analysis
Pioneered by Sakichi Toyoda and later integrated into the Toyota Production System by Taiichi Ohno, the 5 Whys Root Cause Analysis is a powerful problem-solving technique. This method moves teams beyond treating surface-level symptoms by using iterative questioning to uncover the fundamental cause of a problem. The premise is simple: for every identified issue, you ask “Why?” repeatedly, typically five times, until the core process or systemic failure is revealed.
This approach prevents recurring issues by ensuring solutions are directed at the root cause, not just the immediate effect. For instance, a DevOps team experiencing a deployment failure might start with “Why did the deployment fail?” (The server ran out of memory). By continuing to ask why, they might progress from a simple memory issue to discovering an inadequate server provisioning process, a far more impactful problem to solve. This method transforms a retrospective from a complaint session into a deep diagnostic investigation.
When to Use This Technique
The 5 Whys is one of the most effective retrospective facilitation techniques when a team needs to understand a specific, significant failure or recurring obstacle. It is particularly useful for:
- Investigating critical incidents, such as production outages, security breaches, or major bugs.
- Addressing persistent process bottlenecks that repeatedly slow the team down.
- Teams prone to “quick fixes” that need a framework to encourage deeper, more systemic thinking.
- Technical teams, like software engineers or manufacturing units, examining quality defects or system failures.
How to Implement It Effectively
To conduct a successful 5 Whys analysis, structure the session to encourage honest exploration without assigning blame.
- Define the Problem: Start with a clear, concise problem statement that everyone on the team agrees on. Example: “The new user registration feature failed in production last Tuesday.”
- Ask “Why?” Iteratively: Ask the first “Why?” and have the team brainstorm the direct cause. Once an answer is agreed upon, use it as the basis for the next “Why?”. Continue this process until the root cause is identified, which may take more or fewer than five iterations.
- Focus on Process, Not People: Frame the inquiry around systemic issues. The goal is to find flaws in the process or system, not to blame individuals. For example, instead of “Why did Jane deploy the wrong code?”, ask “Why was it possible for the wrong code to be deployed?”.
- Develop a Countermeasure: Once the root cause is identified, the team should collaboratively create a specific, actionable countermeasure. This is the “fix” that will prevent the chain of events from happening again. Assign an owner and a deadline to ensure it gets implemented.
Pro-Tip: Involve a diverse group in the analysis. Including people from different roles (e.g., developers, QA, product owners) can prevent tunnel vision and reveal connections between different parts of the workflow that a single perspective might miss.
7. Starfish Retrospective
An evolution of the classic Start/Stop/Continue model, the Starfish Retrospective introduces more nuance, allowing teams to explore subtler aspects of their work. This technique expands the feedback structure into five distinct categories: what to Start Doing, what to do More Of, what to Keep Doing, what to do Less Of, and what to Stop Doing. This five-pointed framework encourages a more granular and sophisticated conversation, acknowledging that some practices need adjustment rather than a simple binary decision.
The infographic below illustrates the distinct feedback streams of this technique, providing a visual guide for structuring the session.
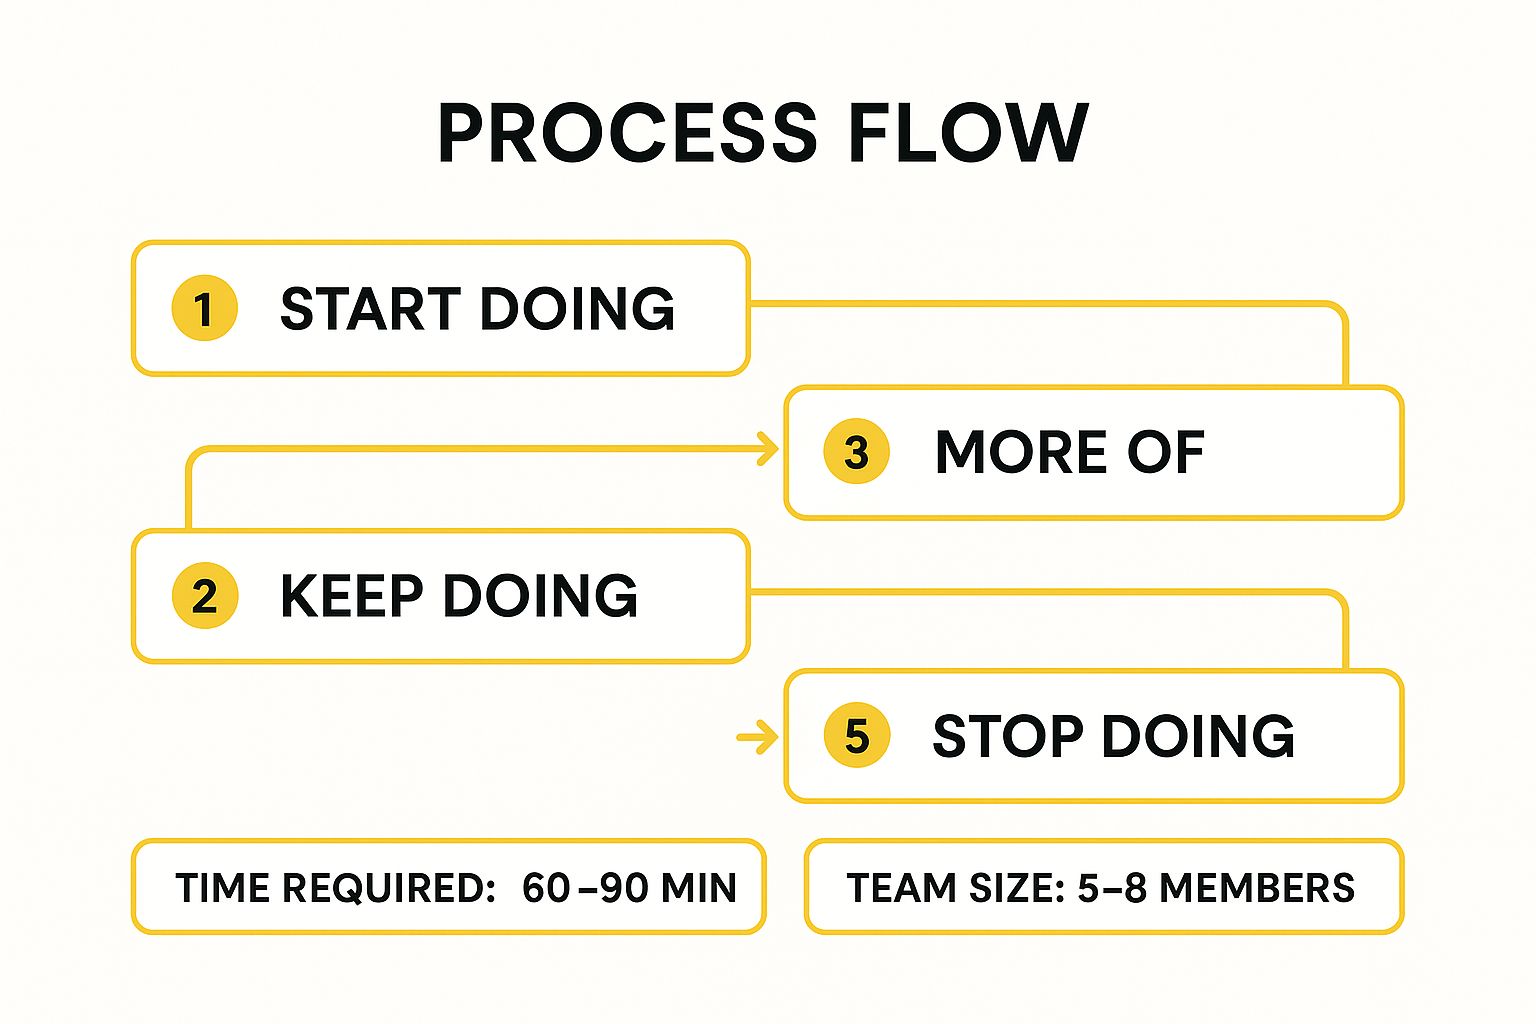
The flow from “Start” to “Stop” allows teams to map their processes on a spectrum of value, while the recommended time and team size ensure the discussion remains focused and productive. A mature product team might use this format to decide to start using a new design handoff tool, do more user acceptance testing, keep their bi-weekly syncs, do less ad-hoc bug fixing outside the sprint, and stop deploying code on Fridays. This level of detail makes it one of the most insightful retrospective facilitation techniques for experienced teams.
When to Use This Technique
The Starfish format is perfect for teams that have outgrown simpler formats and are ready for a more detailed self-assessment. It is particularly effective for:
- Mature agile teams looking to fine-tune their established processes.
- Cross-functional teams needing to analyze complex collaboration and handoff points.
- Cycles where progress feels stagnant, as the nuanced categories can uncover subtle areas for improvement.
- Leadership teams examining organizational policies and their cascading impacts.
How to Implement It Effectively
To run a successful Starfish Retrospective, a clear process is key to managing the five feedback categories.
- Set the Stage: Draw a large five-pointed starfish on a whiteboard (physical or digital), labeling each point with one of the categories. Clearly explain the distinction between each, especially between “More Of” (scaling up something good) and “Keep Doing” (maintaining a current success).
- Individual Reflection: Allocate 10-15 minutes for team members to silently write their thoughts on sticky notes and place them in the corresponding section of the starfish.
- Discuss and Clarify: Go through each category one by one. The person who wrote each note provides a brief explanation, allowing for group discussion and clarification. Group similar notes to identify patterns.
- Prioritize and Act: The team can become overwhelmed by trying to address all five areas at once. Use dot voting across all categories to identify the 2-3 most impactful items. Create clear, owner-assigned SMART goals for these items.
Pro-Tip: Focus the discussion on the “Less Of” category to uncover activities that drain energy or resources without being completely useless. These are often prime candidates for process optimization that simpler retrospectives might miss.
By providing a structured way to handle nuanced feedback, the Starfish Retrospective helps teams achieve a higher level of process maturity. For more guidance on integrating such detailed discussions, you can learn more about mastering the retrospective in a sprint on Resolution.de.
8. Appreciative Inquiry (4-D Cycle)
A powerful departure from problem-focused retrospectives, Appreciative Inquiry is a strengths-based approach that shifts the team’s focus from what’s broken to what’s working exceptionally well. Popularized by David Cooperrider, this technique uses a positive psychology lens to build on existing successes. It operates on the principle that teams gain more by amplifying their strengths than by solely fixing their weaknesses, leading to increased motivation and engagement.
The framework guides teams through the “4-D Cycle”: Discovery (appreciating what gives life and energy to the team), Dream (envisioning what could be), Design (co-creating the ideal future), and Destiny/Deploy (implementing and sustaining the new design). This positive orientation makes it one of the most transformative retrospective facilitation techniques for building team morale and fostering a culture of excellence. For example, a team could use the Discovery phase to recall a sprint where collaboration was seamless, then Dream about making that level of synergy a daily reality.
When to Use This Technique
Appreciative Inquiry is most effective when a team needs a boost of positive energy or wants to build on a foundation of success. It’s particularly well-suited for:
- High-performing teams aiming to innovate and reach the next level of excellence.
- Teams recovering from a difficult period or a setback, helping them rebuild confidence by focusing on past successes.
- Organizations undergoing positive transformations where aligning team energy with a forward-looking vision is critical.
- Kick-off sessions for new projects to establish a positive and ambitious tone from the start.
How to Implement It Effectively
To run a successful Appreciative Inquiry retrospective, guide the team through the four distinct phases:
- Discovery: Ask the team to share stories about peak moments. Use prompts like, “Describe a time when you felt most alive and proud of our work together.” Identify the core strengths and conditions that made these moments possible.
- Dream: Encourage creative, “what if” thinking. Ask, “What would our team look like in a year if we amplified the strengths we just discovered?” Allow free-flowing, ambitious ideas without limitations.
- Design: Translate the dream into concrete possibilities. The team collaborates to create “provocative propositions” or design statements that describe their ideal future state as if it were already happening. For instance, “We operate with a state of creative flow, delivering value with joy and zero friction.”
- Destiny (or Deploy): The final step is to create actionable commitments. The team identifies specific, tangible steps they can take immediately to move toward the future they designed. Assign owners and establish a follow-up plan to sustain momentum.
Pro-Tip: Ground the “Dream” phase by starting from the concrete examples in the “Discovery” phase. This prevents the vision from becoming too abstract and ensures it’s built upon real, shared experiences.
By focusing on what energizes a team, Appreciative Inquiry unlocks new potential. For those looking to foster this kind of positive momentum, you can learn more about how to improve team collaboration at Resolution.de. As one of the more profound retrospective facilitation techniques, the 4-D Cycle helps teams build their future on a foundation of their greatest strengths.
Retrospective Techniques Comparison Matrix
| Technique | Implementation Complexity 🔄 | Resource Requirements ⚡ | Expected Outcomes 📊 | Ideal Use Cases 💡 | Key Advantages ⭐ |
|---|---|---|---|---|---|
| Start, Stop, Continue | Low – simple format, easy to adopt | Low – minimal materials, 45-60 min | Actionable improvements, balanced feedback | New teams, quick feedback cycles, regular check-ins | Clear structure, time-efficient, balanced feedback |
| Mad, Sad, Glad | Medium – requires skilled facilitation | Medium – 60-90 min, safe environment | Emotional processing, team empathy | Teams facing challenges, post-incident reviews | Builds psychological safety, balances emotions |
| Sailboat/Anchors and Wind | Medium – metaphor explanation needed | Medium – 60-75 min, visual aids | Visual insights on blockers and drivers | Visual teams, goal-oriented discussions, creative environments | Engaging metaphor, forward-thinking focus |
| 4Ls: Liked, Learned, Lacked, Longed For | Medium-High – four categories, longer sessions | Medium-High – 75-90 min, structured facilitation | Comprehensive reflection and growth | Learning-focused teams, quarterly reviews | Thorough analysis, strong learning focus |
| Timeline Retrospective | High – chronological mapping, detail focused | High – 90-120 min, wall/digital space | Pattern recognition, shared history | Long retrospective periods, complex projects | Reveals cause-effect, uncovers trends |
| 5 Whys Root Cause Analysis | Medium – disciplined iterative questioning | Low-Medium – 45-75 min per problem | Root cause identification, systemic fixes | Problem-centric retrospectives, incident reviews | Simple yet deep analysis, prevents recurring issues |
| Starfish Retrospective | Medium-High – five nuanced categories | Medium – 60-90 min, clear explanation | Granular feedback, prioritized improvements | Experienced teams, detailed process analysis | Nuanced insight, gradual change recognition |
| Appreciative Inquiry (4-D Cycle) | High – four-phase cycle, comprehensive | High – 2-4 hours or multiple sessions | Strength-building, sustainable positive change | High-performing teams, transformation initiatives | Builds on strengths, fosters engagement and innovation |
Turn Insight Into Action: Your Next Steps in Facilitation
You have now explored a robust toolkit of eight powerful retrospective facilitation techniques, from the straightforward Start, Stop, Continue to the deeply analytical 5 Whys Root Cause Analysis. We’ve journeyed through methods that focus on emotion like Mad, Sad, Glad, and those that use metaphor to uncover obstacles, such as the Sailboat/Anchors and Wind technique. Each framework offers a unique lens through which your team can view its progress, processes, and interpersonal dynamics.
However, true mastery extends beyond simply knowing how each technique works. The real art of facilitation lies in understanding when and why to choose a specific method. It’s about becoming a diagnostic expert for your team’s health and performance, prescribing the right format to address their current needs and challenges.
Synthesizing Your Toolkit: From Knowledge to Wisdom
Merely reading about these approaches is the first step. The next is to internalize the core purpose behind each one. Think of these retrospective facilitation techniques not as a rigid menu, but as a dynamic set of tools you can adapt and even combine.
- For diagnosing energy levels: If your team seems disengaged or is experiencing “retrospective fatigue,” switching from a logical format like Start, Stop, Continue to an emotionally resonant one like Mad, Sad, Glad can re-energize the conversation.
- For shifting focus: Is your team stuck dwelling on negatives? Introduce Appreciative Inquiry to pivot the discussion toward strengths and what’s already working. This can build positive momentum and reveal solutions that were previously overlooked.
- For pinpointing specific issues: When a complex, recurring problem plagues a sprint, a general format like the 4Ls might not be deep enough. This is the perfect time to deploy the 5 Whys or a Timeline Retrospective to drill down into root causes and specific events.
The ultimate goal is to create a safe, structured, and engaging environment where every team member feels empowered to share openly. Your role as a facilitator is to guide this process, ensuring that the insights generated don’t just hang in the air but are converted into concrete, actionable improvements.
Creating a Cadence of Continuous Improvement
Effective retrospectives are the engine of an agile team, but that engine requires consistent maintenance and fine-tuning. The most successful teams don’t just hold retrospectives; they cultivate a culture where continuous improvement is a shared value.
Here are your actionable next steps to turn these techniques into tangible results:
- Plan Your Rotation: Don’t let your retrospectives become stale. Proactively plan to rotate through different formats every few sprints. Announce the upcoming format ahead of time so team members can come prepared to think in a new way.
- Start Small and Adapt: If you’re new to a technique like the Starfish Retrospective, don’t be afraid to try it. Be transparent with your team, explain the goal, and gather feedback afterward on the format itself. This practice of “retro-ing the retro” is a powerful meta-skill.
- Bridge the Gap to Action: The most common failure point for any retrospective is a lack of follow-through. Ensure every session concludes with clearly defined, assigned, and time-bound action items. These items should be treated with the same importance as any other task in your project backlog.
By thoughtfully applying these diverse retrospective facilitation techniques, you move beyond simply asking “What went well?” and start fostering deeper, more impactful conversations. You empower your team to not only solve problems but also to innovate, collaborate more effectively, and take collective ownership of their success. This is how you transform a routine meeting into the most valuable ceremony of your sprint.
Ready to elevate your agile meetings and ensure insights from your retrospectives translate directly into action? The NASA – Not Another Standup App by resolution Reichert Network Solutions GmbH integrates with Jira to structure your retrospectives, track action items, and create a centralized journal of all your team’s decisions. Explore how to build a stronger culture of continuous improvement by visiting resolution Reichert Network Solutions GmbH.
