

Have you ever given a lecture that was so good, you wished each of your students could watch it? In this blog post, we will show you how to record Zoom lectures and publish them on Confluence. This is a great way to scale up your education efforts and reach a larger audience. Not only is Confluence a great repository of knowledge, but it also allows you to share content that wouldn’t otherwise be found. So don’t wait any longer – start recording your lectures with Zoom today!
Should lectures be recorded?
The short answer: yes.
Here’s a bit of a longer answer.
When you record class lectures, you multiply the impact of your delivery. There’s no limit to how many folks can watch you.
Quality can also increase: you can combine text, images and spoken words. Your lecture is far more memorable. And students don’t have to take notes just to be able to go back to what the teacher said. They can just go back to the video, over and over.
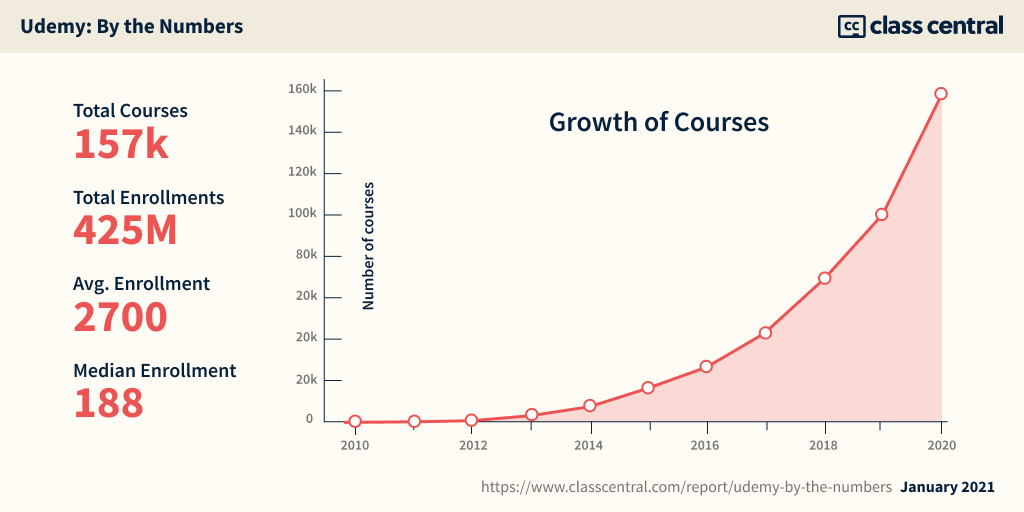
The success of platforms like Udemy, LinkedIn Learning or Coursera is testament to that.
Recording content emancipates the classroom
In blended learning approaches, students don’t just sit and wait. They use the classroom to engage in debates, conversations and activities where the role of the instructor is that of a facilitator, rather than a lecturer.
That doesn’t mean that lectures don’t matter. However, they should happen outside of the classroom. There are many reasons for the instructor to record video lessons that students can watch at their own pace. Just to list out three examples:
- The recording can contain a traditional lecture with content the students must know and understand;
- It can summarize the discussions and dive deeper into some aspects;
- Or can be used to give step by step instructions for an assignment. Since videos are more memorable than text, this might be a more effective tactic to communicate the expectations for complex homework.
In all these cases, lectures need to be recorded and shared with the group.
Recording trainings is just as important
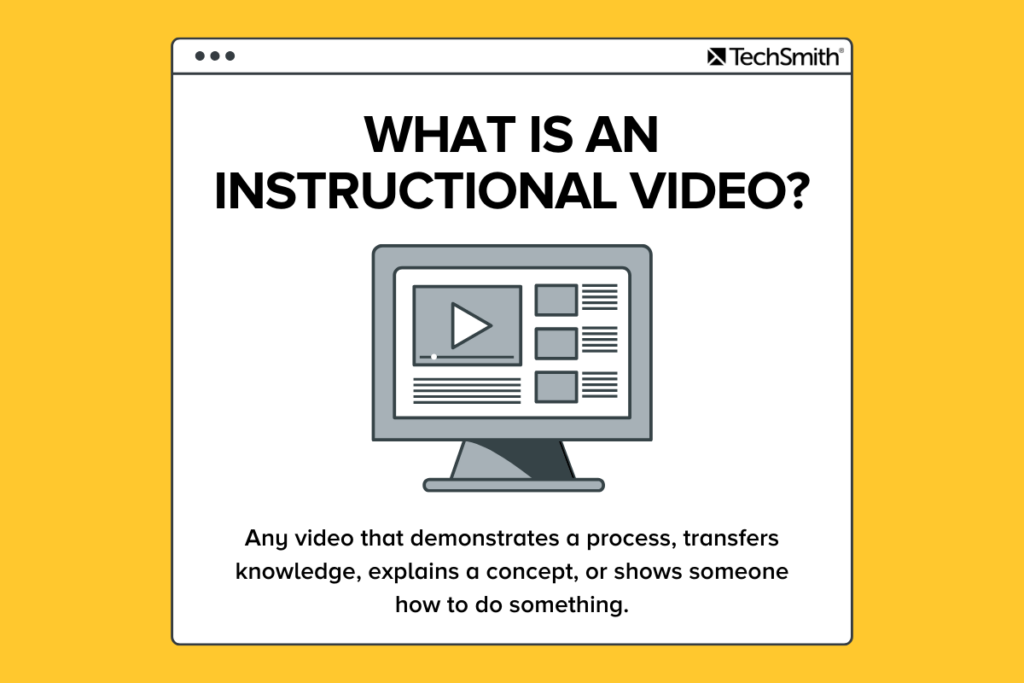
The same happens for company trainings and instructional videos, which TechSmith defines as “any video that demonstrates a process, transfers knowledge, explains a concept, or shows someone how to do something”.
In the pre-pandemic times, many trainings were still happening in the office. They required all employees to stop working at the same time. Plus, they were very intensive in teaching resources.
Skip forward to 2022, and there is no reason to keep doing this.
Workshops, brainstorms, dynamic sessions where everyone should actively participate? Do them in the office or remotely with a virtual whiteboard.
Sure, you can record those as well to have them as a reference. But don’t expect anyone to watch a recording of a 4-hour workshop from start to end.
Onboarding materials, internal processes, job requirements, compliance, upskill trainings? Record them so you only have to do it once and every employee can jump on it as they need it. Practice instructional videos, and you will get them right.
Choosing the right screen recording software
The landscape of possible options is baffling. Don’t even try to go into a full evaluation. On the contrary, I recommend you keep it simple.
Zoom recording might be the smarter choice
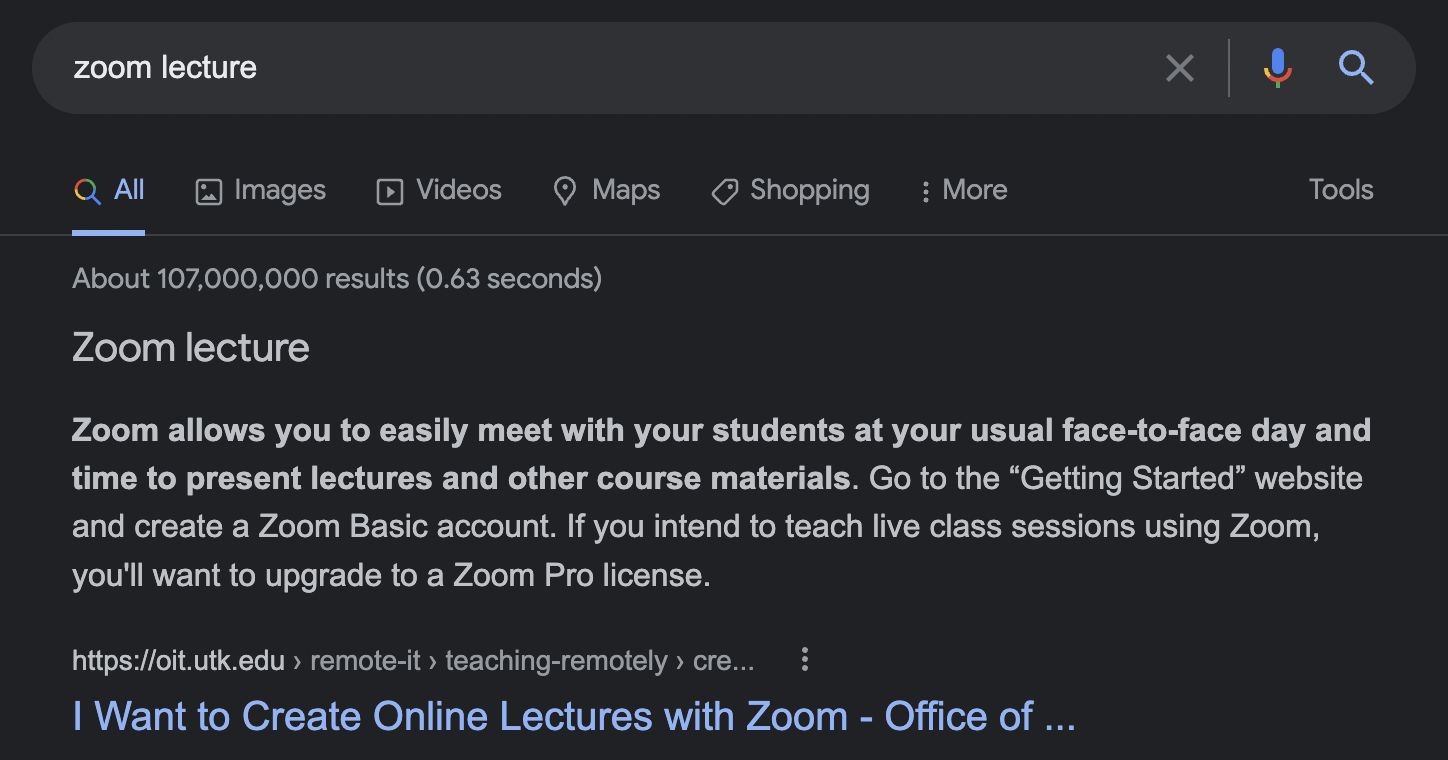
While not its first and foremost purpose, Zoom is a decent screen recording software. It’s also often being used as a lecture recording app by many colleges and universities that have been teaching remotely for a better part of the last two years.
Why Zoom instead of something else? Well, if you already have Zoom, there’s no need to spend extra money for a dedicated video recording software. Zoom will do the trick, and trainers will already know how to open it and use it.
Different ways to record Zoom lectures
Zoom offers two recording options: recording to the cloud or recording to your local device.
Recording Zoom lectures to the cloud
Recording to the cloud is the easiest way to go, although you will need a paid plan.
Simply start your zoom meeting and click on “Record” in the bottom toolbar. Your recording will automatically be saved to the Zoom Cloud and you can access it anytime, anywhere.
Recording Zoom lectures to your local device
If you want to record to your local device, you can use a free plan – but you will need to first download the Zoom app. Once you have it, launch it and start recording. When you are done, the file will be automatically saved to your computer.
Now that you know how to record lectures with Zoom, let’s move on to publishing them on Confluence!
How to publish Zoom recorded lectures
Recorded lectures will start picking up some mold unless they are shared with the right audience. So you better put them out there in your wiki and bootstrap your course.
Use Confluence as a LMS
There are hundreds of Learning Management Systems with apps in the Zoom marketplace. But why should you onboard an additional software if you can repurpose what you’re already using?
Confluence can be a wonderful Learning Management System (LMS) precisely because it’s very easy to use. In fact, Ivy League universities like Stanford, Cambridge or MIT have adopted it as a Wiki.
Here’s what I like to do when designing a new course on Confluence:
Full-blown Space or modest page?
- First, decide whether you will use an entire Space or only a page. If you’re going to host an entire Semester worth of video lectures, discussions, and student generated content, then a Space is probably worth it. For a shorter training, a page like the example below should be more than enough.
- Once you have decided, simply go ahead and create a new Confluence page or a new Space for the training.
Define the audience, Make it easy to find
Having a training with the best instructional videos is no use if nobody can’t find it. Or if they decide it’s boring before they start watching.
That’s why you need to persuade users to actually hit the play button and watch your course in the first place.
- Describe the overall scope of the course and for whom it is intended.
- Include a syllabus and references for anybody who wants to know more.
Set expectations
Videos take time to watch. So why should anyone watch any of your videos instead of Petacular’s compilation of geese attacks? Communicate what they’re going to win if they invest their time. Here’s a minimum structure.
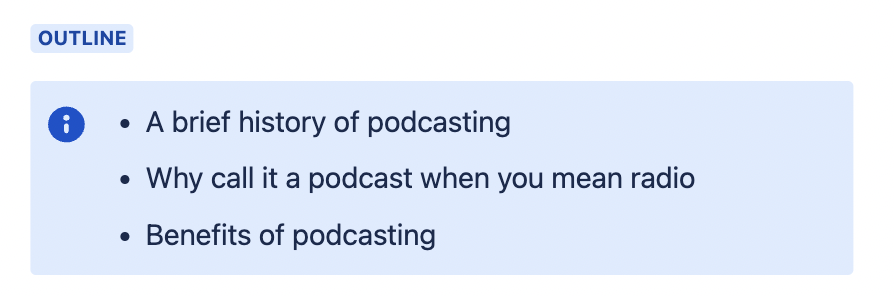
Module Outline
What are the main topics included in the lecture?
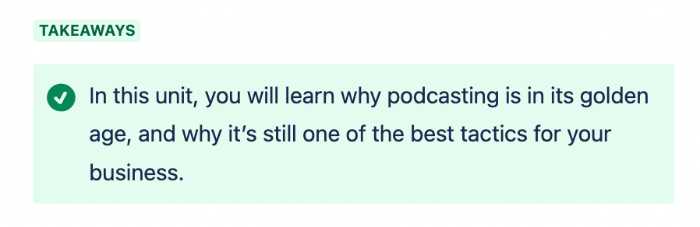
Takeaways
How will the video change watcher’s attitudes and behavior?
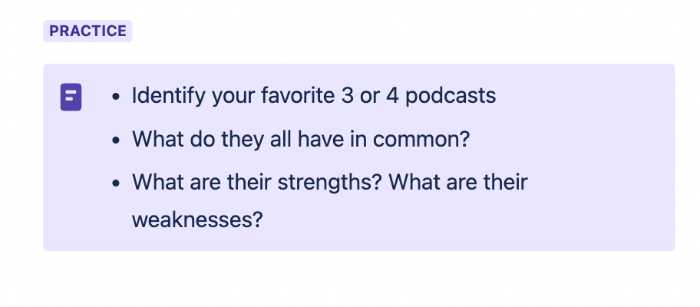
Practice
How can watcher’s keep learning on their own?
Once I have everything setup, I can go into recording mode.
Install Zoom Meetings for Confluence and use it as a Zoom LMS integration
If you haven’t done so yet, I recommend you install Zoom Confluence Plugin – embed Video Recordings & Chapters from the Atlassian Marketplace. You will need a Confluence admin to do this for you!
This app will integrate Zoom into Confluence so you can leverage it as a full Learning Management System. Specifically, you will be able to:
- Split and structure your recorded lectures into chapters for quicker reference
- Publish your cloud Zoom recordings without having to download them first
Finally! Record your lectures with Zoom
Now you’re finally ready to talk to the camera! Here are some tips to make your time count.
Best ways to record lectures
- Prepare for the lecture. Note that the idea here is to be really efficient and not spend any time in post production. Upfront preparation will make you go faster.
- Don’t obsess over getting every word perfect.
- Have a script in front of you so you don’t miss any key points
- Support your message visually! Share your screen whenever it makes sense and have a Powerpoint presentation with some slides ready for any memorable stats, key data, quotes or images
Embed your recorded Zoom Lectures into Confluence
Go back now to your Confluence page and load every new Zoom recording with the plugin:
- type /zoom to load the macro
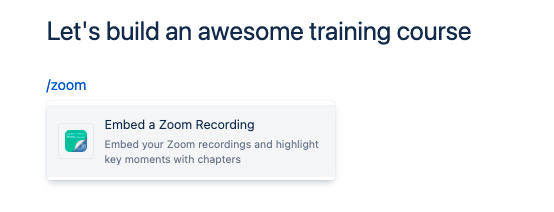
- select the video file you want to load
- add chapters to highlight the different sections. Remember that the video will open automatically at that point whenever the corresponding chapter on the top right corner is clicked!
- hit publish!
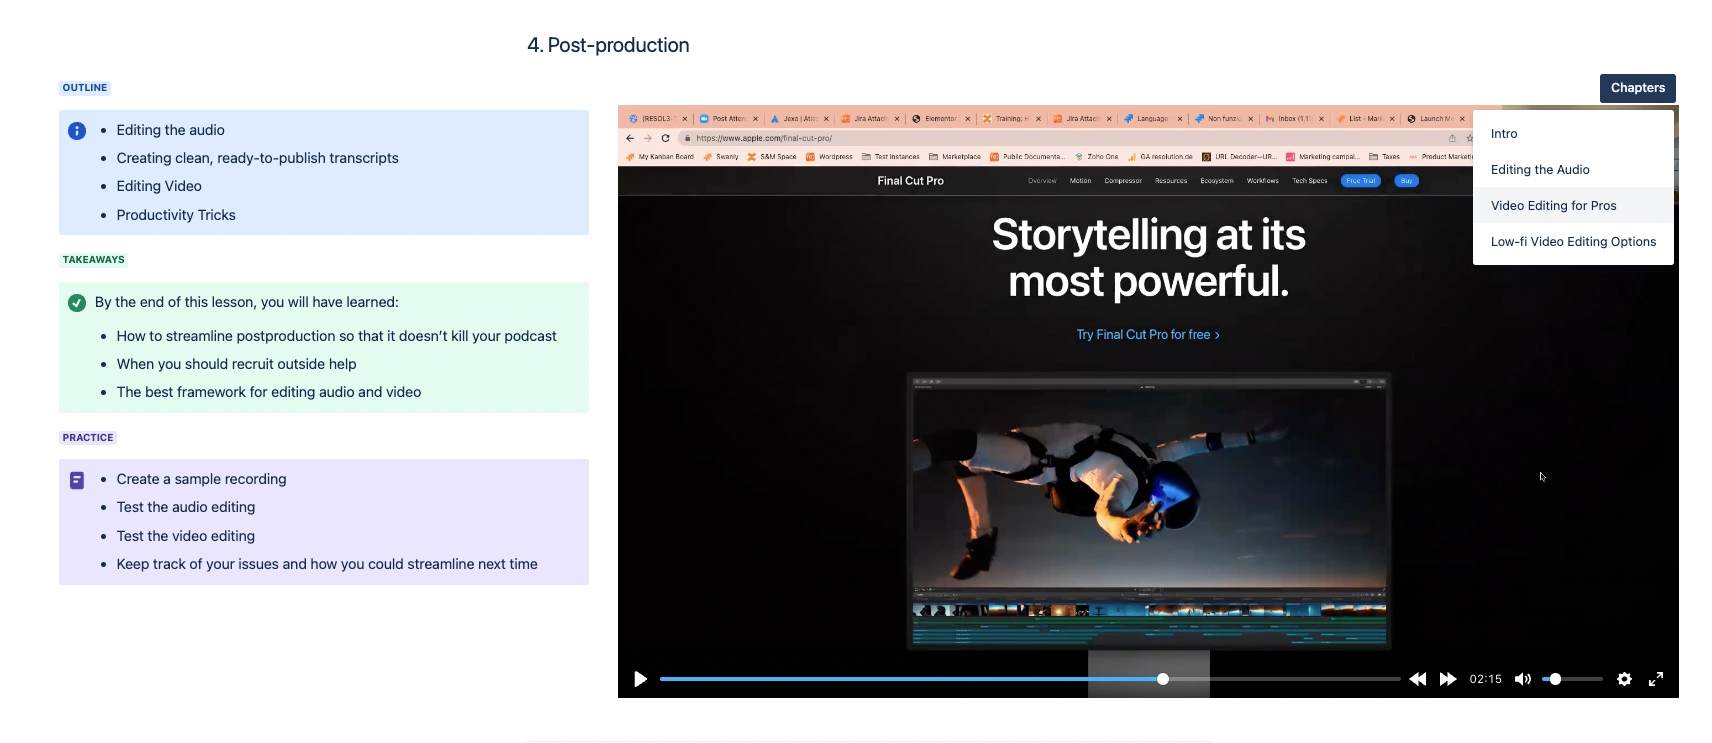
Example: Publishing a Podcast production training
In this example, I have built a training on how to create a great podcast show to grow your business.

The podcast has 5 different modules, and each of them has the common structure that I mentioned above.
Now go and start recording!
Obviously, you can build on top of this structure. Give room for discussions, for submitting exercises, sharing additional references and recorded files, etc.
But if you follow this advice, your lecture recordings will have a permanent home where students can find them. And you won’t have to go back to giving the same class lectures every other month!
