

Introduction: Why deactivating users is key in Atlassian Data Center applications
Update: If you are on Atlassian Cloud, we now offer resolution’s User Management & License Optimizer for Cloud – bringing the same core capabilities as below to Jira Software, Jira Service Management, Confluence, Bitbucket, and more: automated inactivity-based deactivation, bulk actions, and license optimization. Learn more on the product page.
A deactivated user doesn’t count against your organization’s available Atlassian user licenses. However, if you are hosting your Jira or Confluence in Data Center, you already know what deactivating a user doesn’t immediately reduce the number of licenses for which your organization is billed. To change your billing, you must change the current user tier.
Deactivating users can, however, prevent you from having to jump to the next user tier based on an artificial need. According to some estimations, a 30% of user licenses are unused. This happens for a combination of reasons:
- users get Atlassian accounts they don’t actively need.
- users that leave the organization or change role don’t have their accounts deactivated in a timely manner.
As you can see, deactivation is an essential piece of user management in Jira. Failing to deactivate Jira users can have very negative consequences, like exceeding license limits or maintaining access from former employees – a major security concern.
Note: Never delete users in Jira or any other Atlassian tool, as this will remove them from all their history and generate problems like broken queries.
Here are 5 methods for deactivating Jira users
Method 1: Manual deactivation
This method is supported with Atlassian’s standard administration UI and works identically in Jira, Confluence, or Bitbucket. To deactivate a user you must have administrator permissions and follow the next steps:

- Step 1: Go to the User Management section from the administration cog at the right of the top menu bar
- Step 2: Select the “Users” tab on the left panel
- Step 3: Find the user you want to deactivate in the user browser
- Step 4: Once you’ve found the user, click “Edit” under the Actions column
- Step 5: In the modal window, uncheck the Active box, then click update
To entirely delete a user in Jira, then explore the other actions, and hit delete. Again, note that this action can create big problems if that user has a history in the instance. The rule of thumb is to delete only test users or users created by error.
Method 2: Bulk deactivations
This method is particularly useful when you want to deactivate a large number of users from one or more groups or discover sets of users that may not need access to Jira any longer.

These are the prerequisites to deactivate users in bulk in Jira, Confluence or Bitbucket:
- Install User Deactivator from the Atlassian Marketplace. You can also check the product page for more context.
- The user that performs the bulk deactivation will also need an administrator permission
Once you are on the User Deactivator interface, you can deactivate any number of users in bulk:
- Step 1: Navigate to the Bulk User Operations tab
- Step 2: Apply any filters to your search (see here what the user browser lets you do)
- Step 2: Refine the results further including and/or excluding users from certain groups
- Step 3: Select the users you want to deactivate, or hit the box on the top left corner to select all
- Step 4: Click on the “Choose Bulk Action” button, then select “deactivate” from the options
See the full documentation: Administrator Guide – User Deactivator Documentation
Method 3: Automatic User Deactivations
This method is the foundation for a solid deactivation policy. The idea behind is that users who don’t access their Atlassian applications frequently enough (i.e. every month) can be deactivated.
It’s a bit different to what we’ve seen before. You’re not looking for specific users that you want to deactivate. On the contrary, you’re saying: every 24 hours, find every users who haven’t been active in the last 30 days, and deactivate them. This could be a manager or an intern – but it won’t be an admin, as the admin role is protected from deactivation.
You should always have a strategy for reactivating those users when they need access again. And manual reactivation is not the answer! For example, if you’re a customer of the resolution SAML SSO app, then you only need to have user provisioning configured. When you do that, users will be automatically logged in and reactivated the next time they try to use their Jira, Confluence, or Bitbucket account.
These are the prerequisites to deactivate users automatically in Jira, Confluence or Bitbucket:
- Install User Deactivator from the Atlassian Marketplace.
- The user that schedules the automation rule will also need an administrator permission
Once you are on the User Deactivator interface:
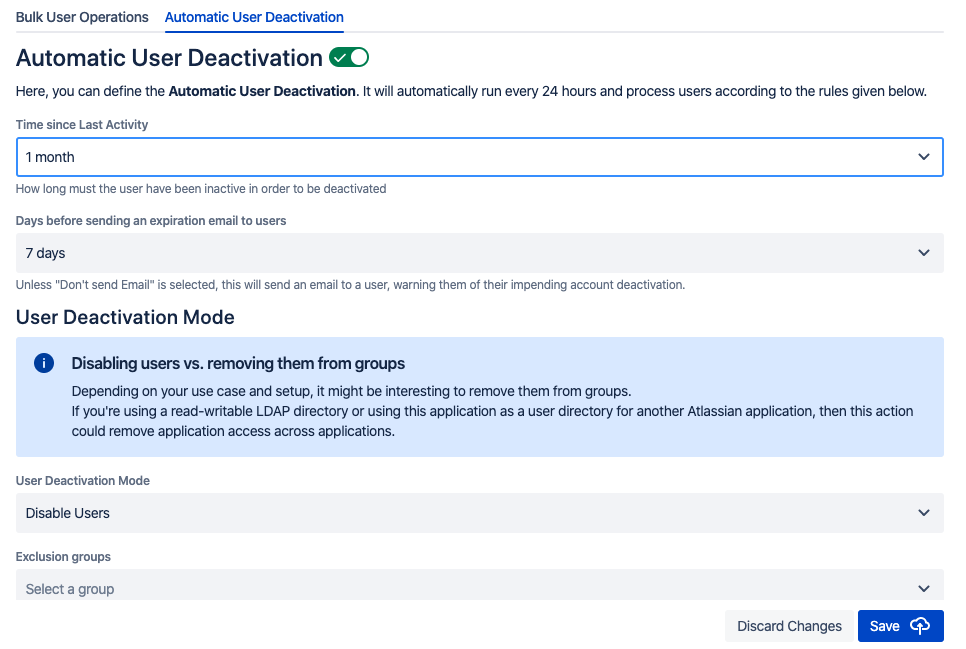
- Step 1: Navigate to the Automatic User Deactivation tab
- Step 2: Select the inactivity period (i. e., 1 month)
- Step 3: Select how much time in advance you will warn users that they are scheduled for deactivation
- Step 4: Select a deactivation mode: deactivate users or remove users from the groups that grant application access.
- Step 5: Exclude selected groups from deactivation
- Step 6: Save the scheduled deactivation
See the full documentation: Administrator Guide – User Deactivator Documentation
Method 4: License Optimization
This method does not strictly deactivate users, but has similar benefits. Watch this video to better understand the functionality:
What it does, in very simple terms, is assign a license only to those accounts who are actively using the Atlassian application. Licenses can then be shared between multiple users as long as they don’t access at the same time. As a consequence, the number of licenses that your team needs can go down very significantly. Particularly if you have folks on different time zones.
If the reason for deactivating users is to eliminate access for users who have changed roles or left the organization, then license optimization will not help you. But if what you want is to make sure that you are not utilizing licenses with users who don’t really need the Atlassian tools, this is a perfectly valid alternative – and a much more efficient one at that.
These are the prerequisites to optimize license utilization in Jira, Confluence, or Bitbucket:
- Install User Deactivator from the Atlassian Marketplace
- The user that configures license optimization will also need an administrator permission
Once you are on the User Deactivator interface:
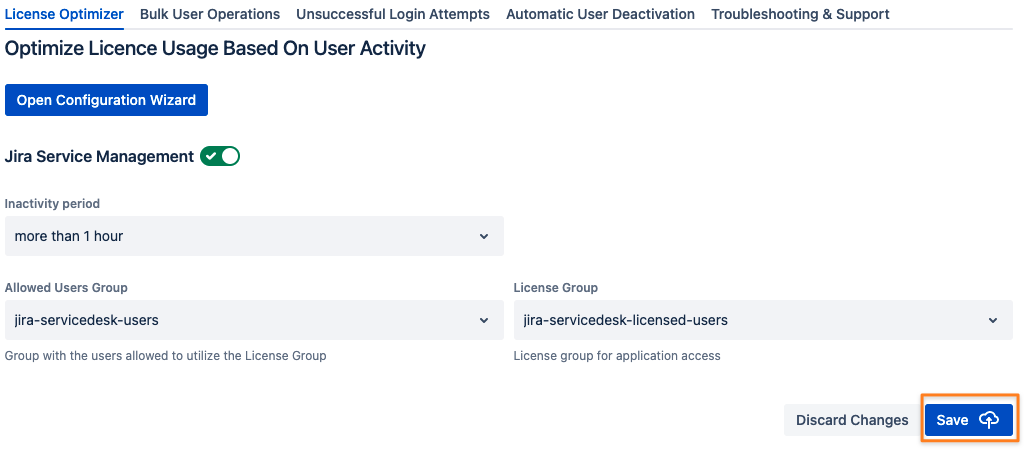
- Step 1: Navigate to the License Optimization tab
- Step 2: Enable License Optimization for the current application (the three versions of Jira count as three applications)
- Step 3: Select inactivity period (similarly to Method 3)
- Step 4: Select in the Allowed Users Group the group that currently gives application acces
- Step 5: Select in the License Group a new group. This will contain the users that consume a license at any given moment
- Step 6: In the application access page, add application access to the new group
See the full documentation here: License Optimizer Admin Guide – User Deactivator Documentation
Method 5: Synchronization to an Identity Provider
If you company’s Single Sign On relies on an Identity Provider like Azure AD, ADFS, or Okta, then you can take their user directories as a single source of truth and easily deactivate Jira users. Cloud providers allow to set ahead-of-time provisioning schemes through their API so that your users already exist in the application before they even access.
This alternative is particularly useful when you want to deactivate users in Jira for the following reasons:
- First, to remove access to Atlassian applications for employees who have left the company.
- Second, to keep role-based authorizations up to date. For example, when an employee leaves the IT department, he should be removed from the corresponding groups.
You can install User and Group Sync to connect Atlassian Server and Data Center applications to your cloud Identity Providers via the API. Once you have installed the app, all you have to do is:

- Step 1: Configure the API connection to your IdP. Have a look at our setup guides for reference.
- Step 2: Map the user attributes in the Identity Provider’s user directory to the Jira user profile
- Step 3: Set restrictions by mandating which groups will have their users synchronized
- Step 4: Schedule the full sync to run periodically
Conclusion
As you can see, there are multiple options for deactivating users in Atlassian applications like Jira, Confluence, or Bitbucket Data Center. If you have a very small instance and the admin knows every user by face, then manual deactivation can still be a good option. But the larger the instance, the less you should rely on manual practices that can produce mistakes, be delayed, and take time away from more valuable activities.
But if you decide to implement an automated approach, there are still plenty of alternatives. Selecting the best way out depends on your current infrastructure, your requirements, and what are the goals that you want to accomplish.
If you have an existing Identity Provider that centralizes user accounts and you are deactivating users there, then the synchronization in method 5 makes sense, because you won’t need to create any additional automations locally. But if you don’t have such robust processes to centralize user lifecycles, then the different deactivation methods that come with User Deactivation should help you achieve anything you need.
We hope this article helps you decide on the best solution for your case.. Contact us if you need any help with the configuration of resolution’s user management apps.
